
Have you decided to start an online sales business?
Do you already have in mind the type of business you want to run and are just looking for a way to put it into practice by creating a website?
Well, in that case, welcome to Framework360, the first complete digital marketing platform.
Among all the available options, it is also possible to create and set up your own e-commerce site step by step in detail, just what we need! Let's see how.
Here is an overview of the main features for configuring and managing your own e-commerce site on the Framework360 platform.
To get started
After registering on the platform and consequently creating your own domain (which can also be imported from other sites that offer this service for a fee, such as Aruba), we will find ourselves on the main screen.
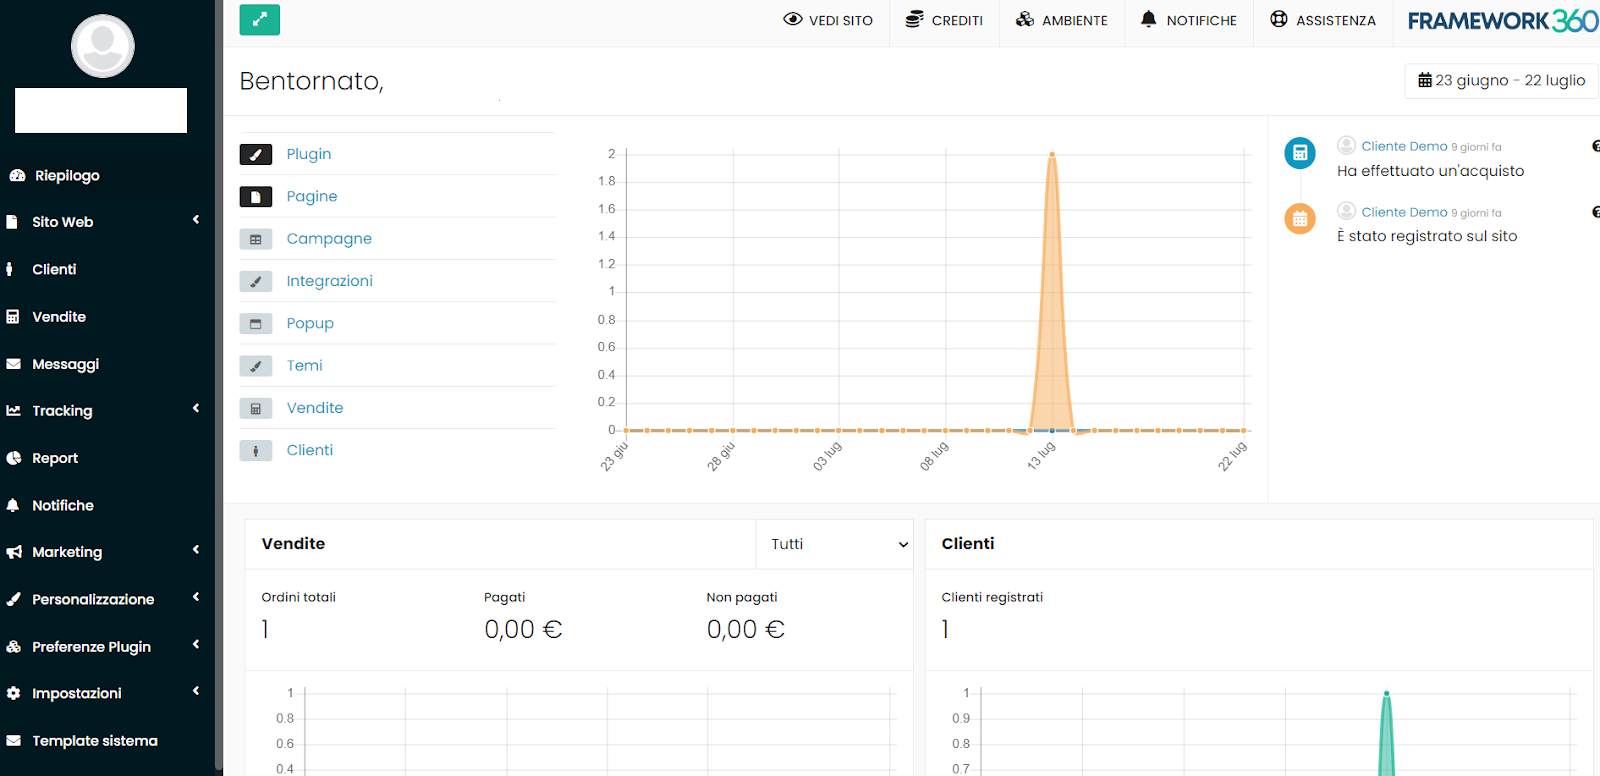
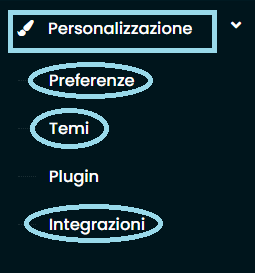
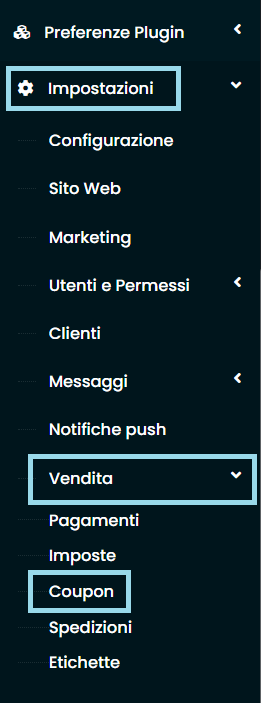
There will be various sections, some already filled with demo data, to help us better understand the functionality and the display of data on the platform. However, what mainly interests us is the section located on the left side of the screen, in the darker column menu, more precisely in the area dedicated to customization.

By opening this area we can in turn access the "Plugin" section, as highlighted in the image, and go to the corresponding screen.
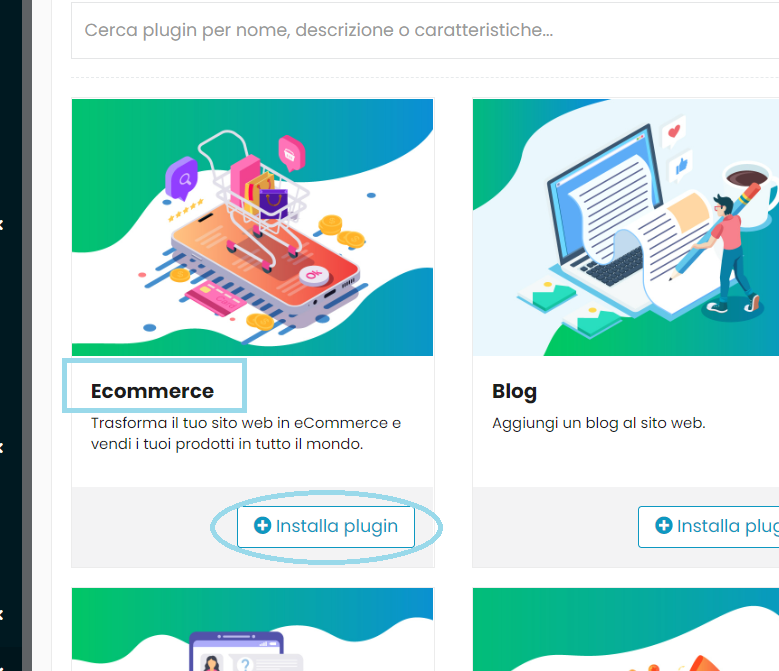
A list of plugins will open up to choose from, ours will be found right at the top, and by clicking on “install”, the system will act in a few seconds making it available on our home page.
Once this is done, in fact, the new “E-commerce” section created with the installation of the plugin will be available in the left block.
Here we can manage some of the most important aspects of our sales activity.
Web page management
The management of our newly created web page goes through three filters according to which we could divide the numerous and various functions that the platform offers us.
-
Customization
-
Marketing Aspect
-
Management Aspect
Customization
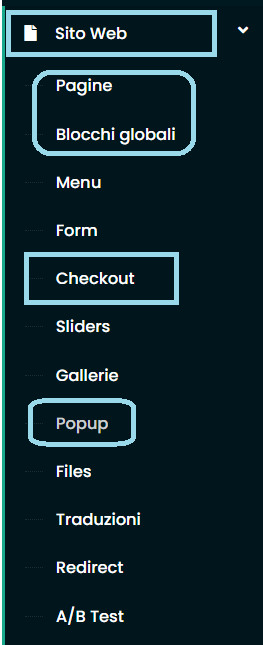
Everything related to customization can be found both in the “Website” section and in the section of the same name on the screen, in our now well-known left vertical menu.
In the first one, we will find various possibilities to set up the different compartments of our site, from the more general ones like pages and blocks (Header and Footer), to those more specific for our business, such as “Popups”, “Forms” and the “Checkout”, which we will look at more closely below.
First of all, it should be clarified, if not already known, that when we talk about Header and Footer pages, we are essentially referring to the top section, generally containing compartments such as the menu, cart, and customer profile; and the bottom section, which usually contains compartments with all the information on privacy and seller contacts.
Popup
Creating one or more popups is very simple.
It will be possible to name them and insert content, customize them, and program their behavior and opening conditions with simple choices, step by step following the various sections as shown in the image.
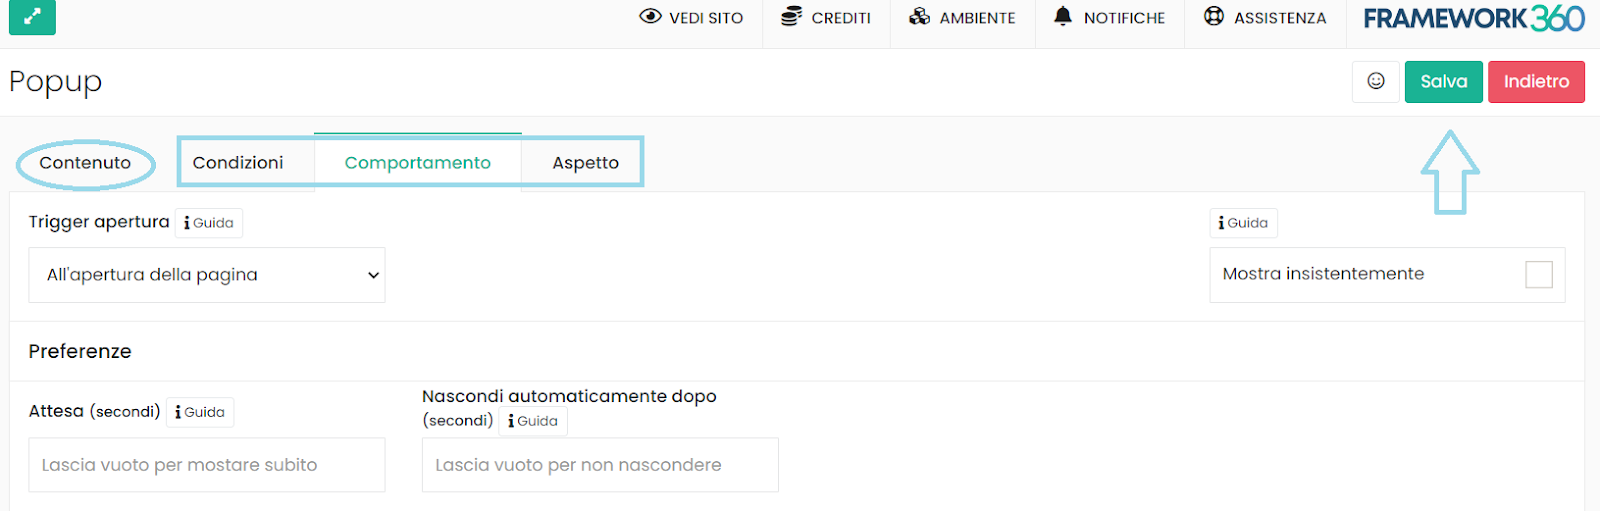
After creating a new popup and establishing its functionality, it will be possible to modify it in the specific "Visual Builder” found on the platform, and drag into it the sections to be modified.
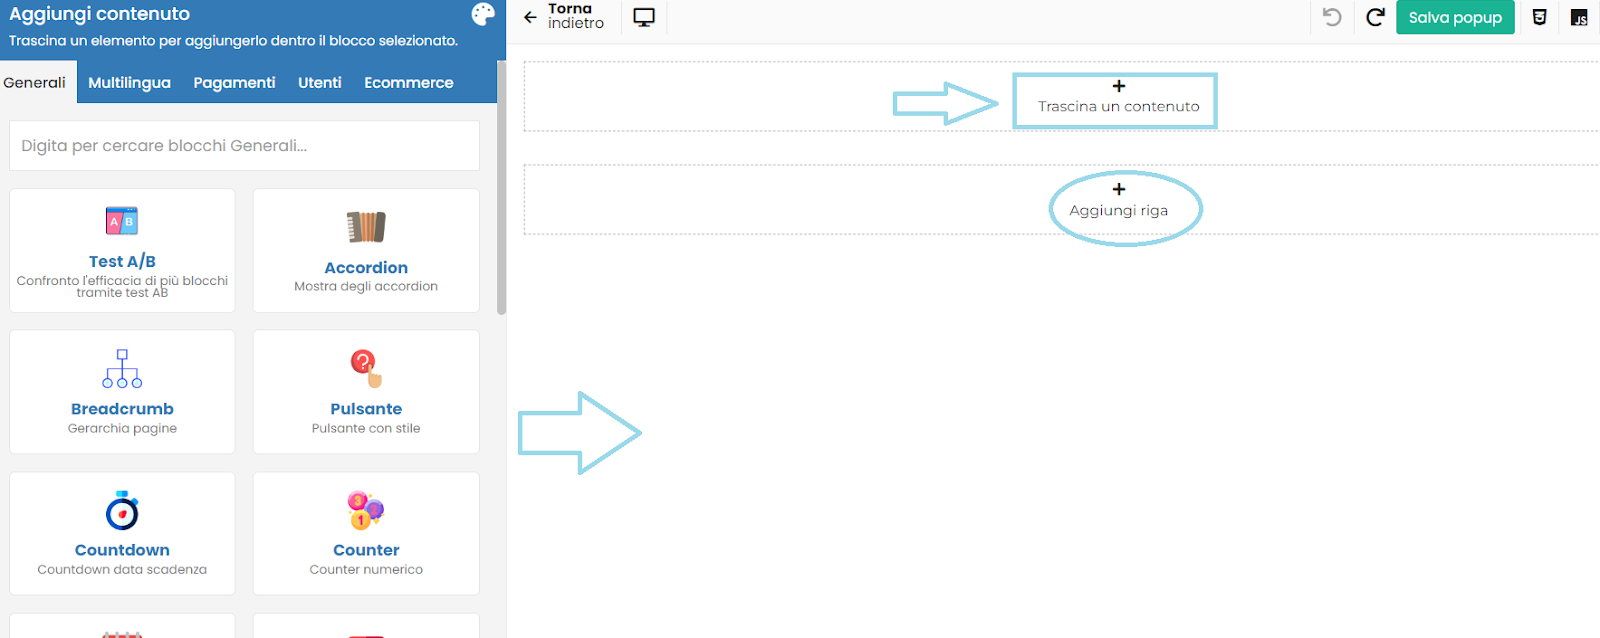
These will help us manage pop-up content, links or important notifications on our site, specifically choosing on which and how many pages to make them appear.
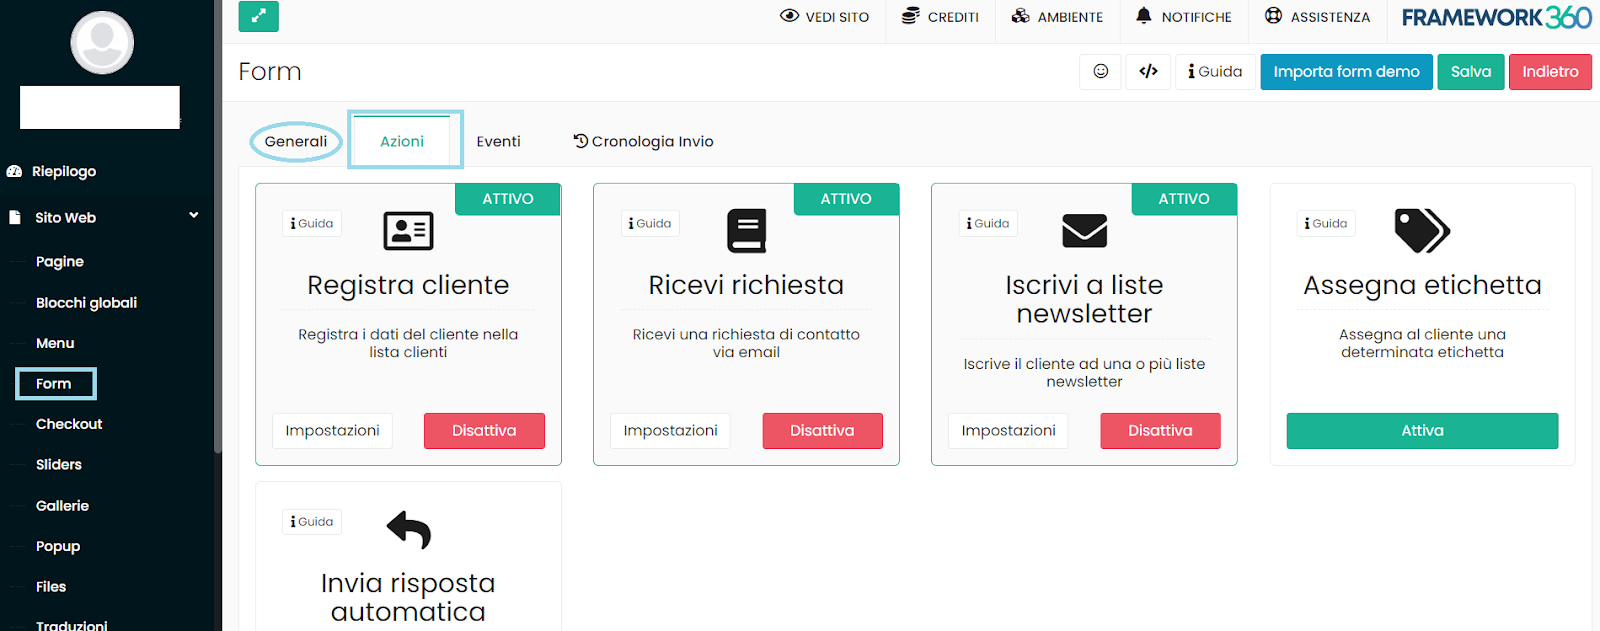
Form
The form is essentially a module that can be used by customers and visitors of the site to contact us, a classic contact form present on every respectable site that cares about customer service.
After clicking on "Form" you can click on "add", and start setting it all up. Starting with the name.
From the visible fields we can then insert all the available actions within such form for our customers.
For a more detailed guide of all the options applicable to this section, we recommend consulting the explanation on our YouTube channel, essential for creating a system to interact with your clientele - Forms Framework360
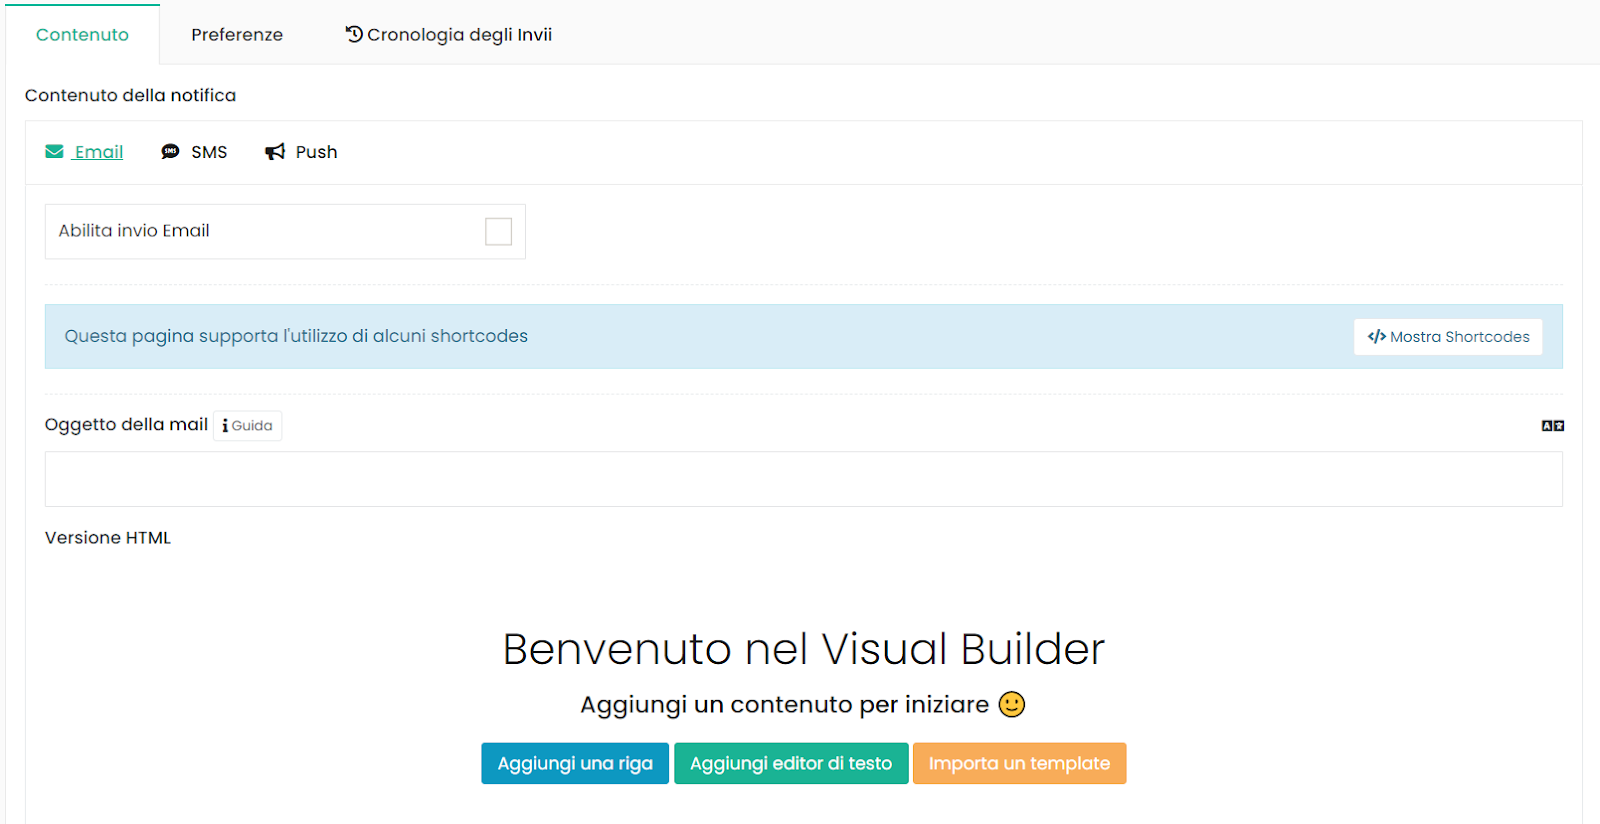
Checkout
This is the final part of an e-commerce website.
It contains many details and is divided into several sections; we will try to explore this functionality in broad terms to ensure we set it up and use it effectively.
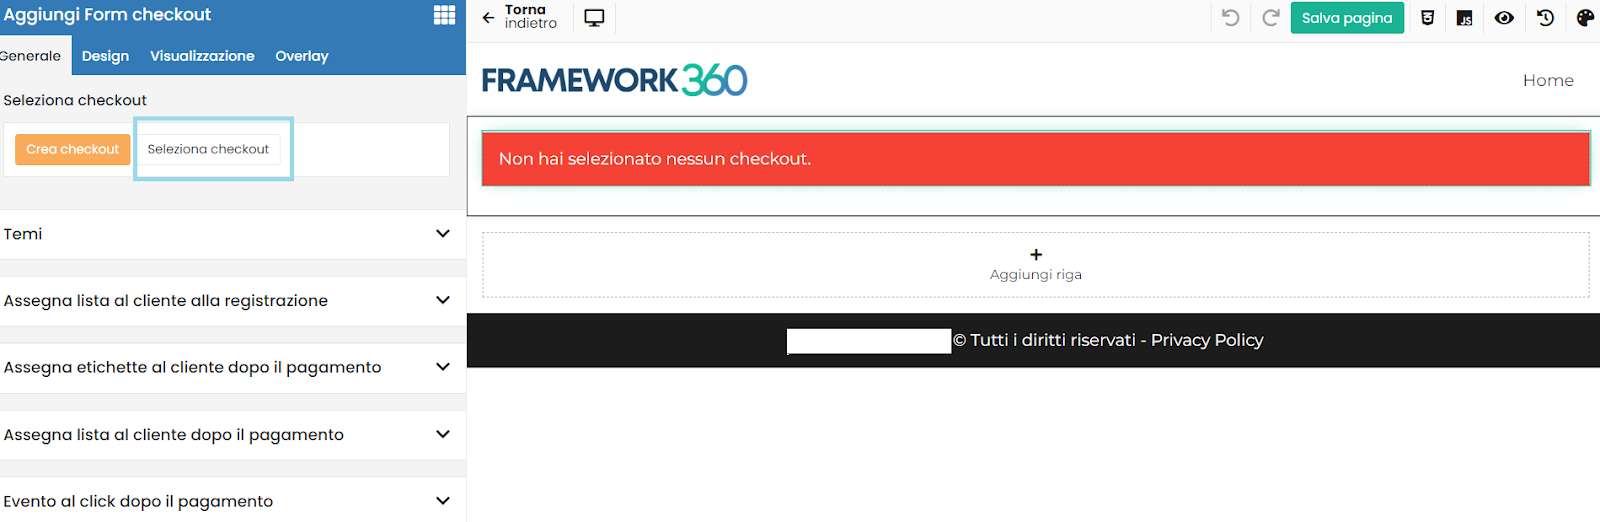
It will be found under the "Website" section, and generally upon opening, we might find a demo checkout page pre-set by the platform itself, which can be modified based on our needs.
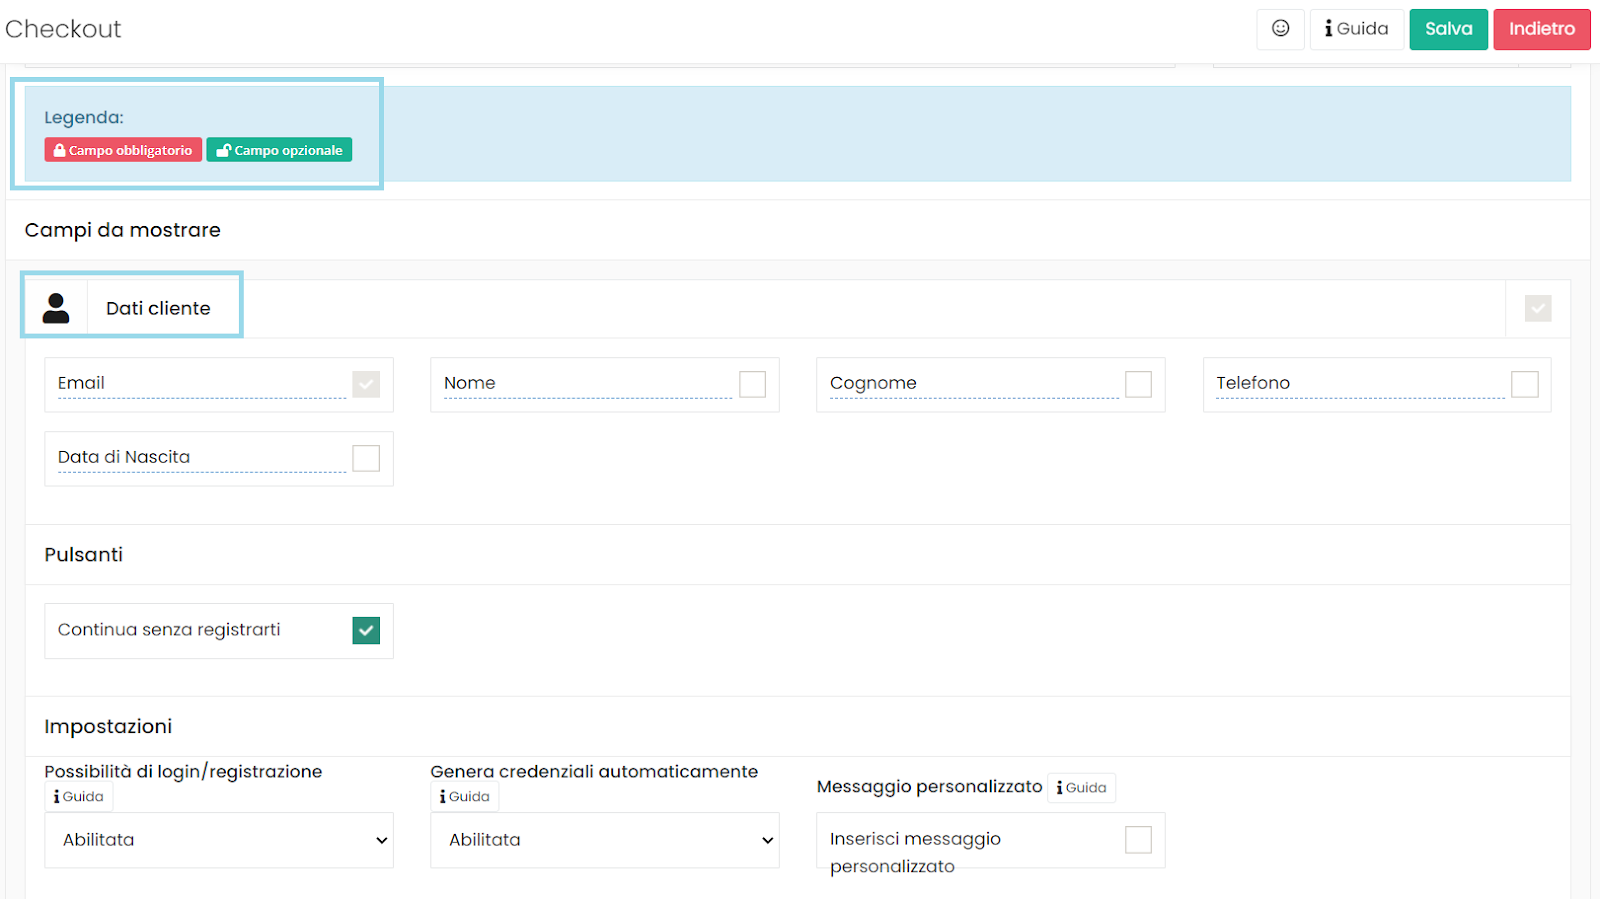
The first thing to note is the legend at the top, which will indicate the fields that customers must fill out as mandatory or not.
After that, there will be a list of programmable sections, starting with the data of the customer who is purchasing, as can be seen in the image above.
Subsequently, in the same way, the sections related to billing and shipping data, the method of the latter and of payment that we want to make available will be viewable and editable.
The last section is that of the summary, where all the information and data entered up to this point during checkout can be displayed.
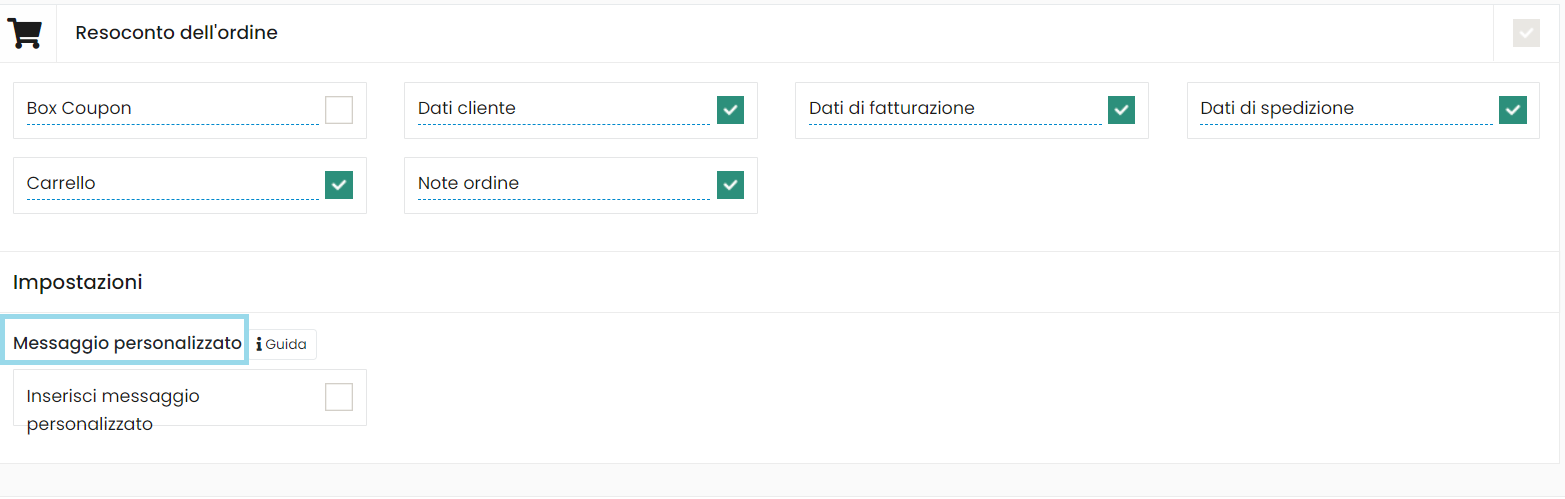
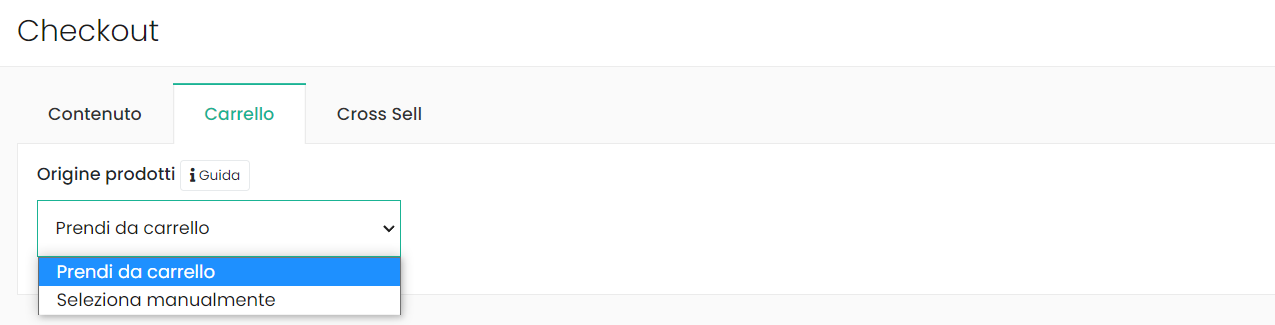
It will also be possible to add a personalized message at the time of checkout, for any indication deemed appropriate to let the customer know, and choose whether to include in the checkout all products added to the cart while browsing the site or not, distinguishing products that must be purchased individually.
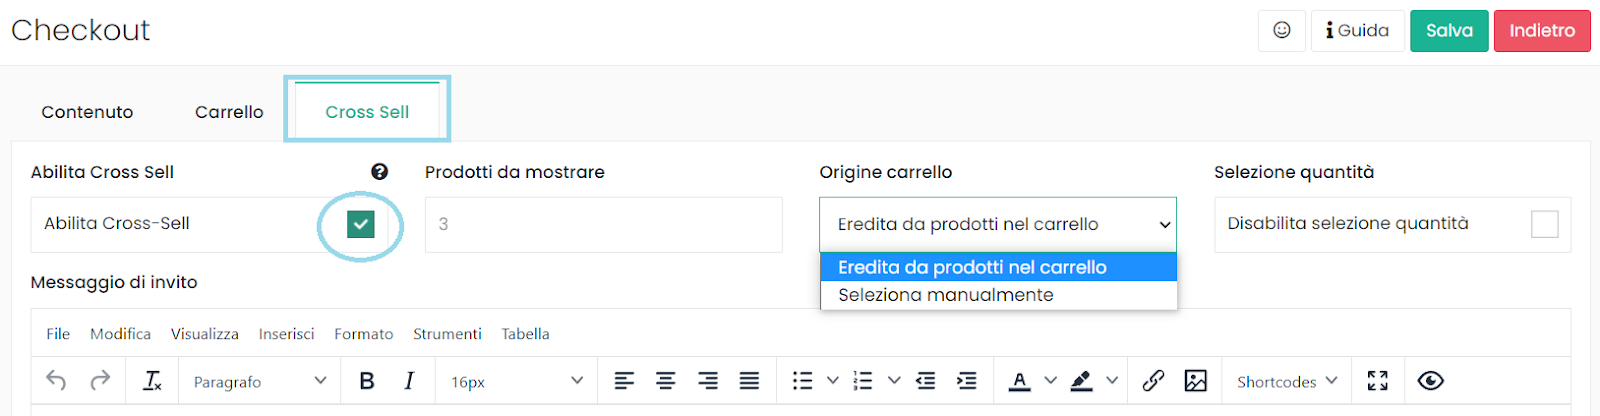
An ultimate additional feature, but not least in importance, is that of “Cross Sell”.
Cross sell essentially consists of the mechanism of suggesting other products related to those that our customer in question is purchasing.
The platform will then be able to choose to recommend products related to those in the cart or products we have manually selected, complete with an invitation message for the customer.
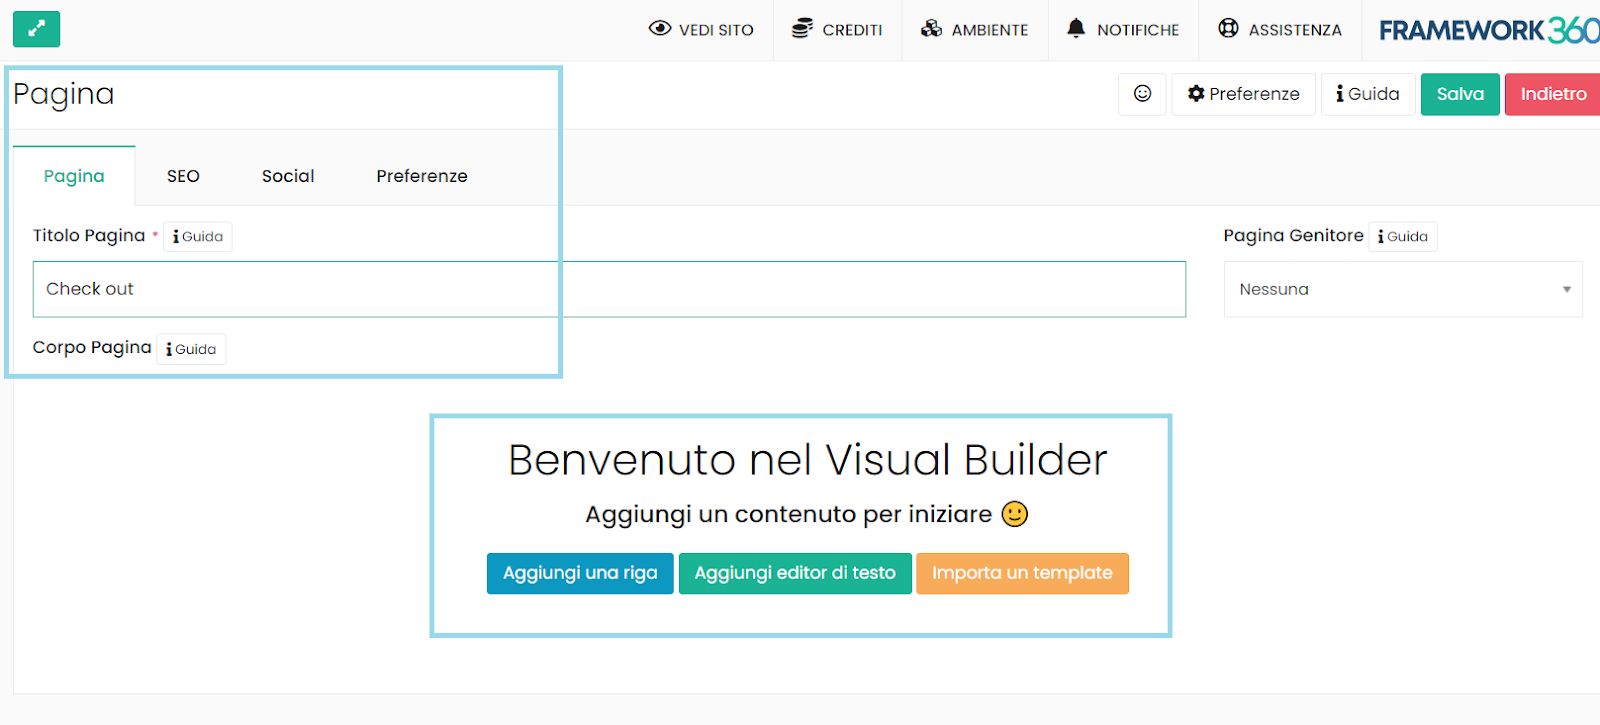
To apply everything we have modified in relation to the checkout up to this point, it will suffice to go to “Website” and “Pages”, and create a checkout page, which can be modified with the well-known Visual Builder.
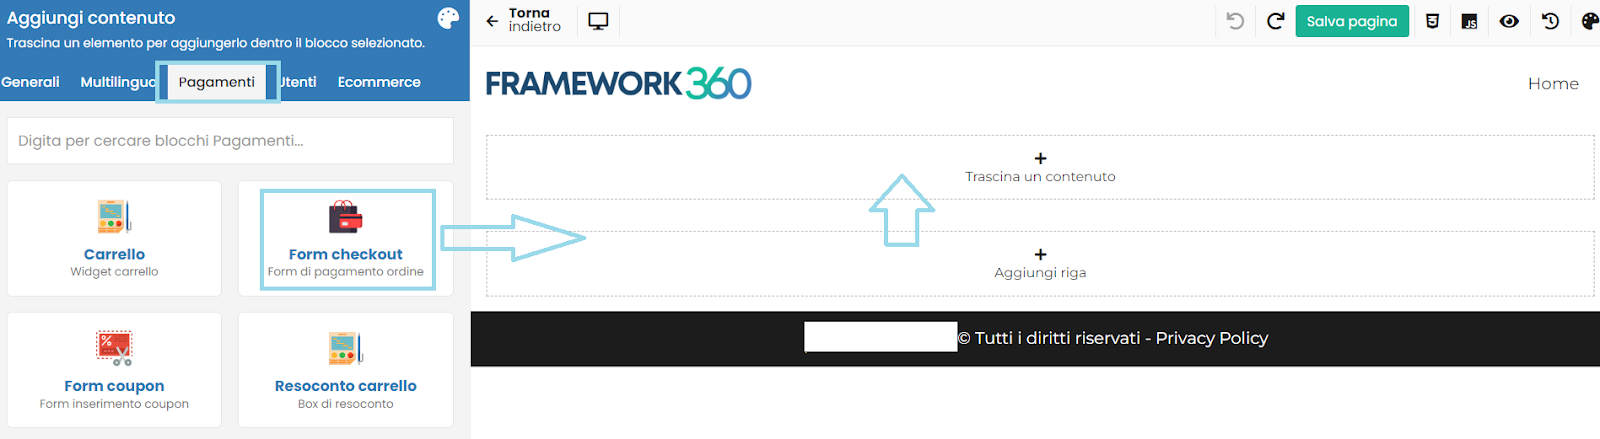
Within it, we could in fact insert our already modified form from the section discussed so far, simply by dragging the form into the contents, and manually selecting the checkout, as visible in the second image.
Customization section
The second dedicated section, aptly named "Customization," will be found just below, as we have previously seen for plugins.
In addition to this last feature, it also contains the area for preferences, themes, and integrations.
Preferences
The preferences area will allow us to manage the sizes, colors, fonts related to buttons, links and boxes on our site, also based on the role we want to assign to them.
But perhaps the two most interesting parts for our aesthetic configuration activity for the e-commerce portal we are building are "Themes" and "Integrations".
Themes
The themes section will allow us to immediately give a more characteristic general aesthetic tone to our activity. As can be seen below, there will be various themes available to choose from; it is up to us to decide which one to install that best suits our needs.
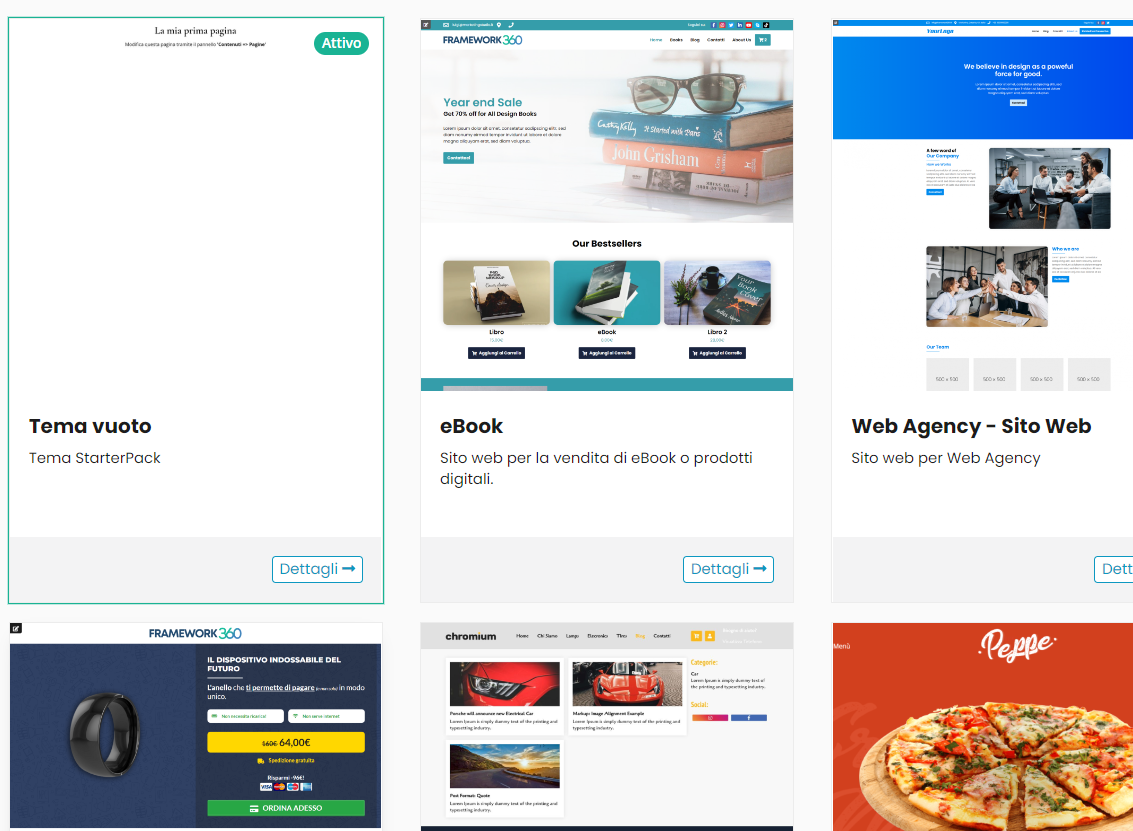
The default theme will be the empty one, but by clicking on the others we can preview the final result and decide to install it with the appropriate button.
Integrations
It will also be possible to install integrations of external services, including Facebook, Amazon, Invoices in Cloud, and others. All installed services will then be viewable under the "Plugin Preferences" section in the vertical menu.
For a broader and more detailed view of the integrations, we invite you to consult our brief video tutorial on our YouTube channel - Integrations - Framework360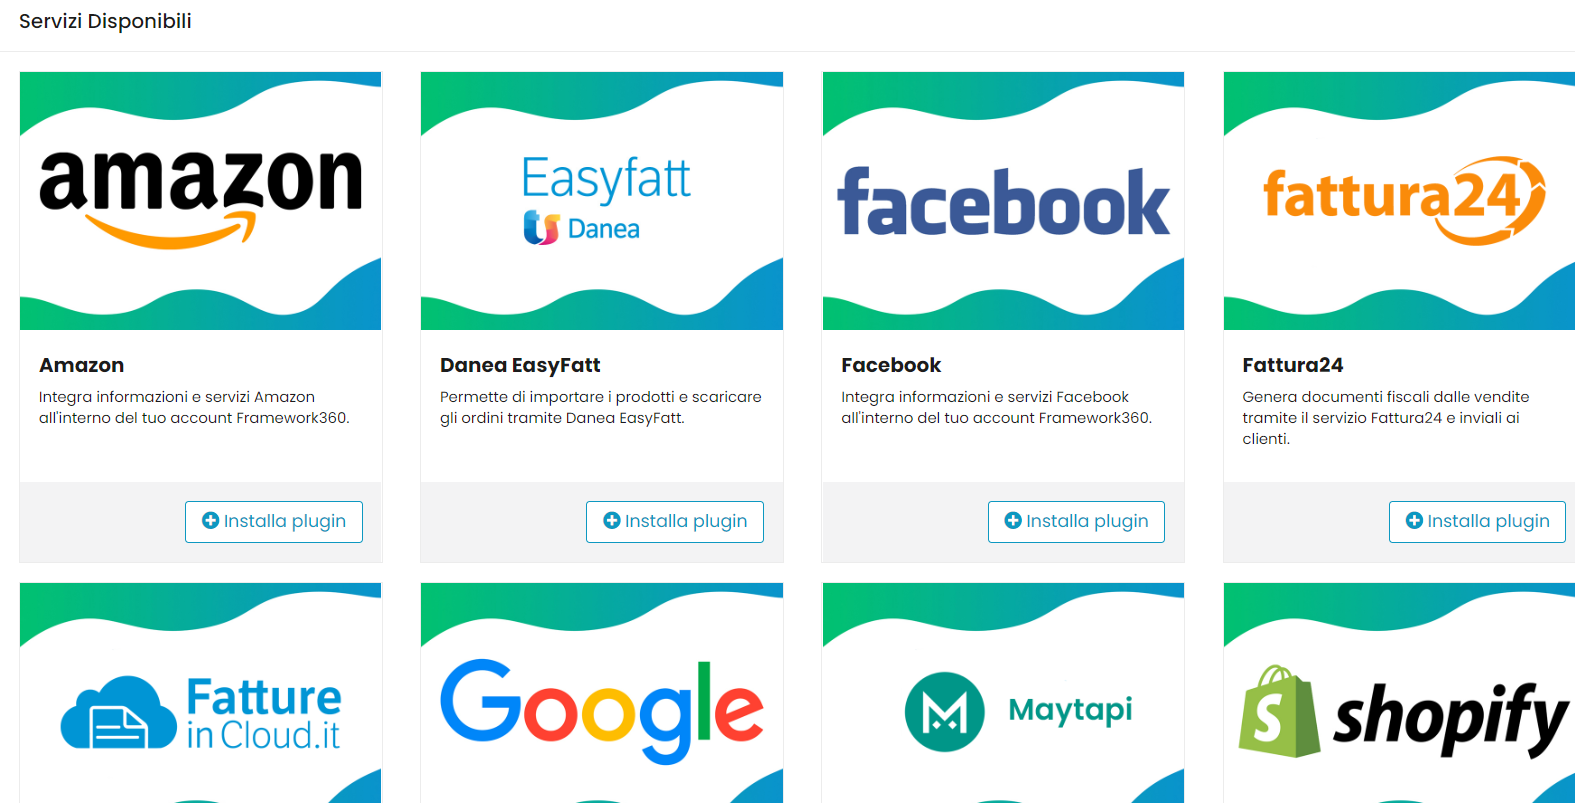
Marketing aspect
We now move on to the second part, which concerns more the management of marketing for our business.
The platform provides various tools to monitor our business, such as dedicated sections for sales monitoring.
In particular, we will talk about the “Campaigns” section and customer loyalty through the use of coupons, two tools that can also be used together.
Coupons
Loyalty from your customers is an extremely important move to make if you want to sell online successfully.
Besides some tools we have already explored in this field, like the contact form, there are others located in different sections.
Among these is the case of the “Coupon” tool, which we will now quickly explore to enable you to use it as effectively as possible as soon as possible.
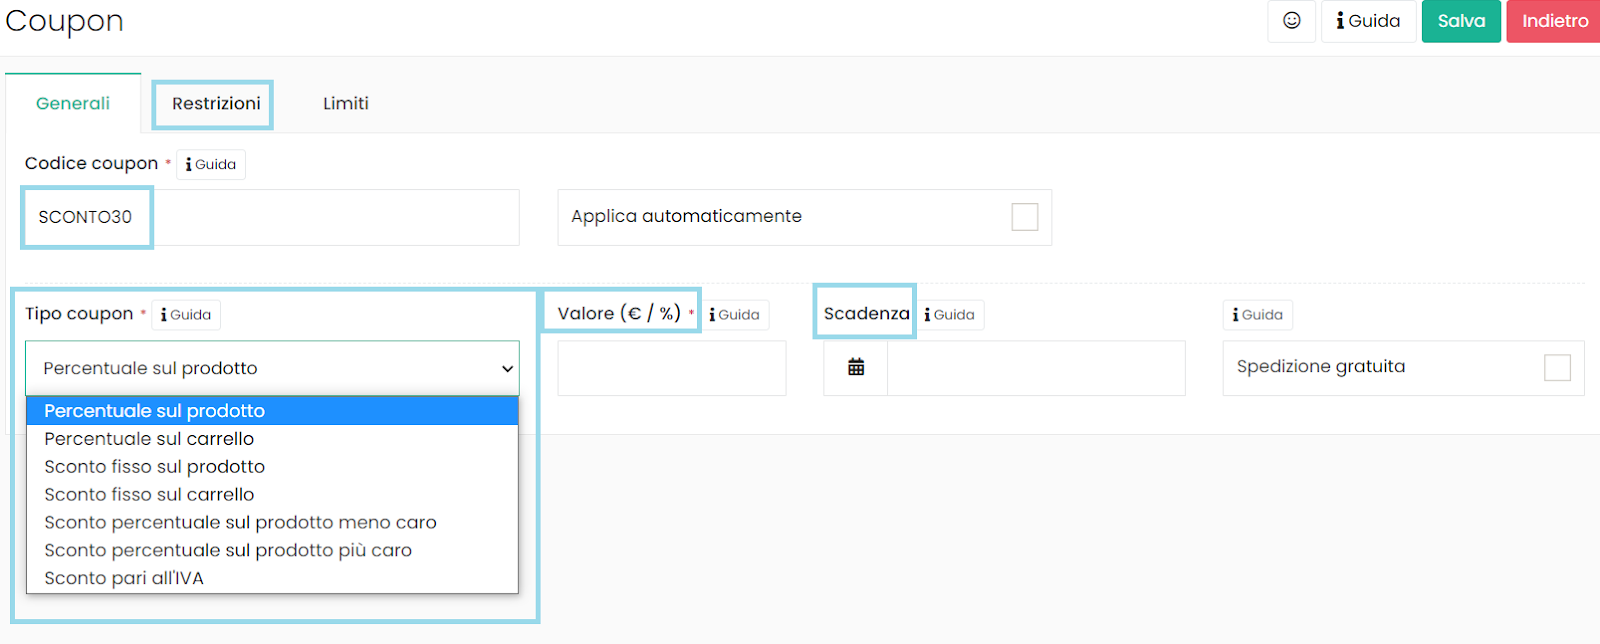
By clicking on “Settings” and then on “Sale,” we can access the screen of interest and add a coupon with the appropriate button.
From here, the process will be simple and intuitive, allowing us to create coupons with their code, for example DISCOUNT30 to indicate a 30% discount, its application options, and its expiration date.
Once our coupon has been created, it can be forwarded to our customers using the second tool that we will see in this section
Campaigns with automations
This is the section that will help us in creating campaigns with automations.
Upon opening the dedicated window, a demo campaign will already be available to modify, or through the “Create new campaign” button it will be possible to start from scratch.
Upon opening the newly created campaign, we will initially need to establish its type.
Having just discussed discount coupons, we might opt for an automation campaign of the "Newsletter" type, incorporating the code we have just created.
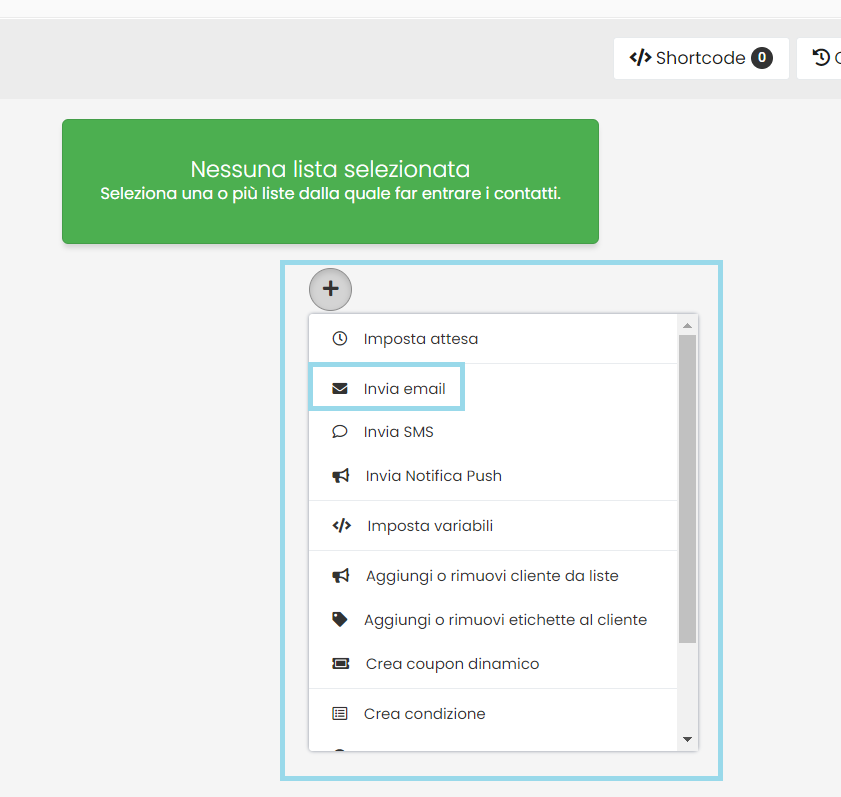
We will therefore choose to send an email that we have compiled to our customer list.
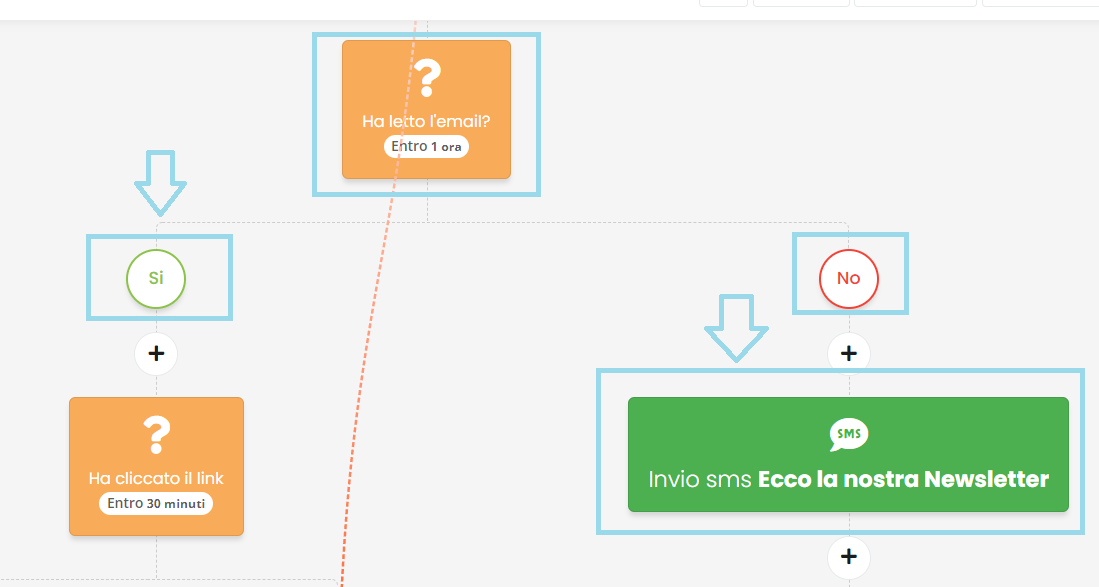
From there, programming options will take care of establishing all subsequent automatic operations as indicated by us, based on time passing or actions performed by the customer himself on his device.
For example, we could choose to resend the email, or an SMS, if within a span of two hours the previous one had not been viewed.
Management aspect
Finally, let's talk about those aspects related to managing one's online business activities, such as organizing the stock and adding products to the website, setting up notifications for customers, and perhaps entering a list of these customers on the platform.
Adding your products
Adding products is obviously essential for what we intend to do with this platform, so let's see in a few steps how to take care of this aspect.
You simply need to go to "E-commerce" and "Products", from there proceed with the insertion, either through CSV import or by manual addition.
Once you've clicked the "Add" button, you will be on the actual page, ready to receive all the information you want to link to your item: from the image to the name itself, from price to stock availability and description (available in more or less detail).
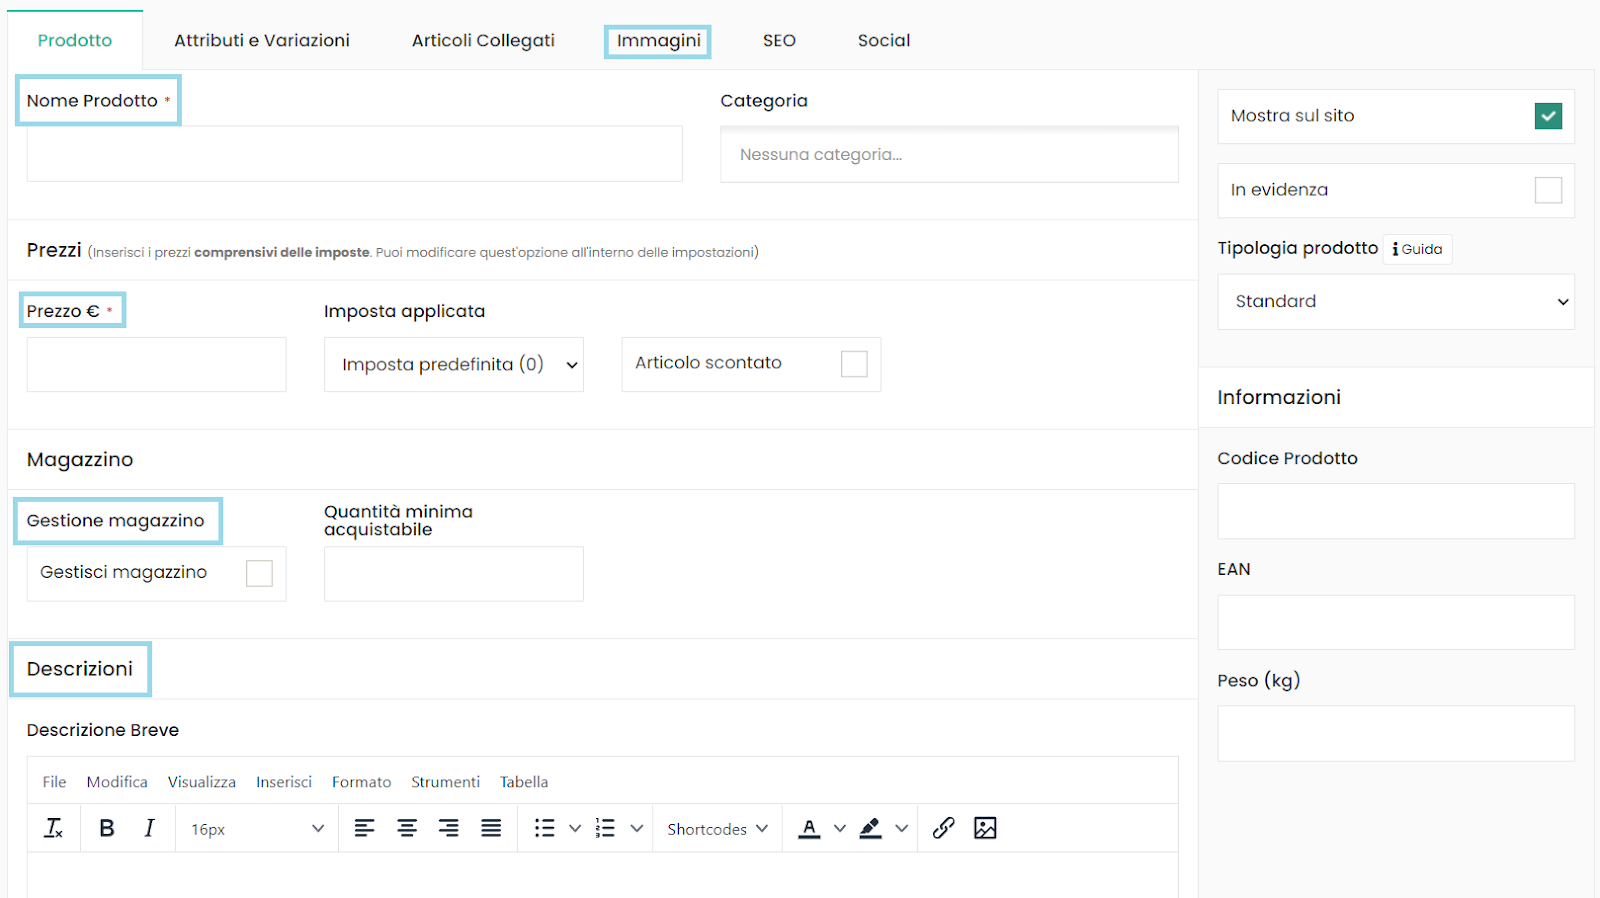
As you can see in the image, there are numerous settings that offer the possibility to create a well-detailed and varied shop, both in terms of basic information and more specific details, including promotions and discounted products.
Furthermore, it's worth highlighting the ability to sell non-physical items, such as gift vouchers or digital articles with download availability after purchase, and the option to link other items for sale, also through the Cross-sell feature we previously saw regarding the checkout section.
It is also important to enable the inventory management option, to make public the available stock quantities and determine the minimum purchasable amount.
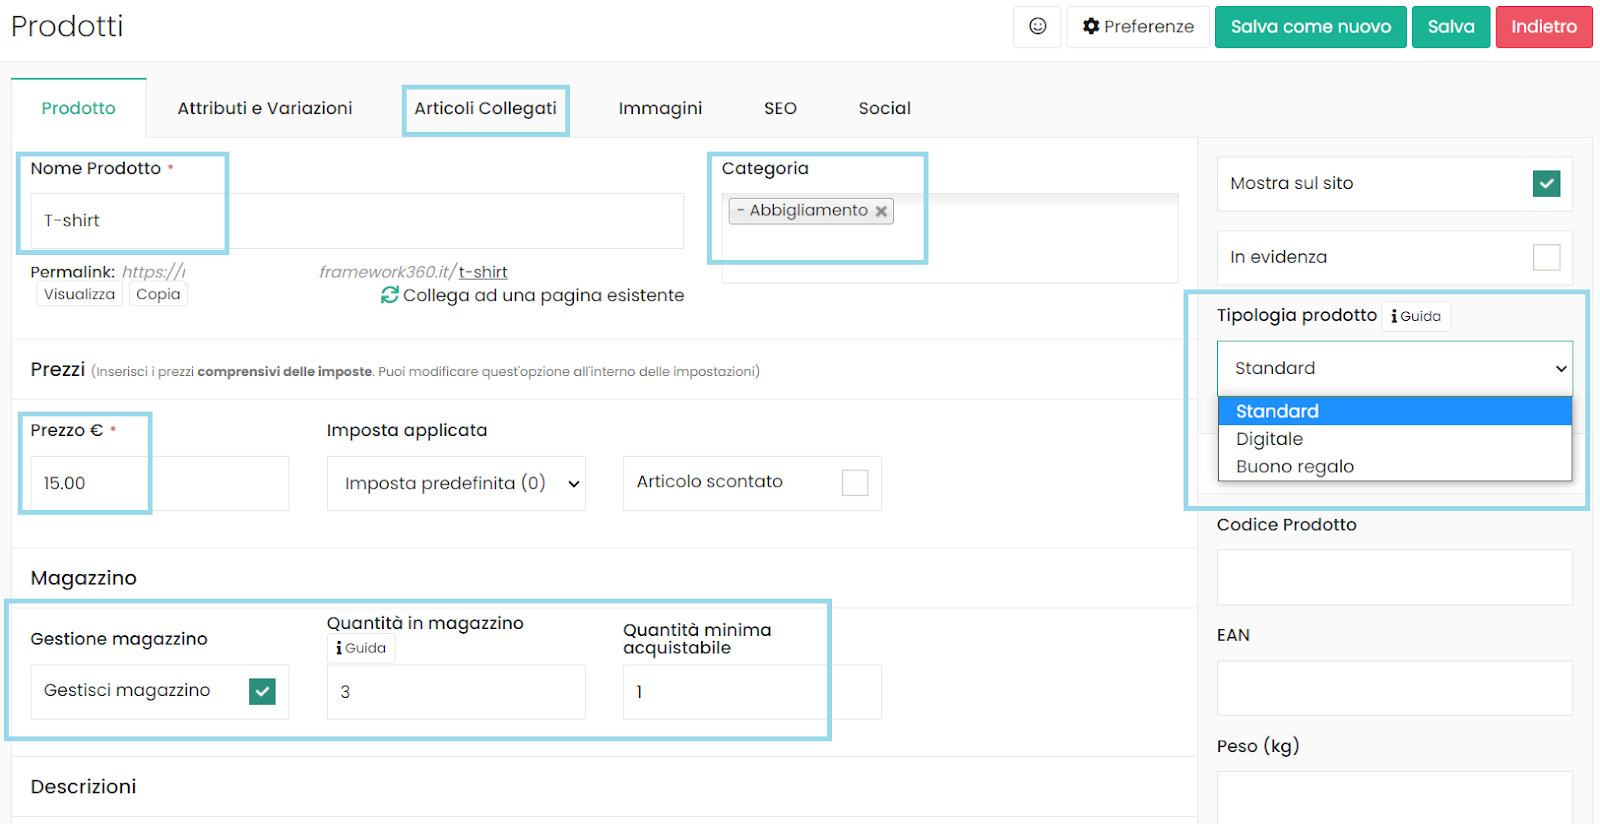
The product can also be categorized with the corresponding option, which will make available to you the categories already created by you thanks to the homonymous section "Categories", located under the "E-commerce" one.
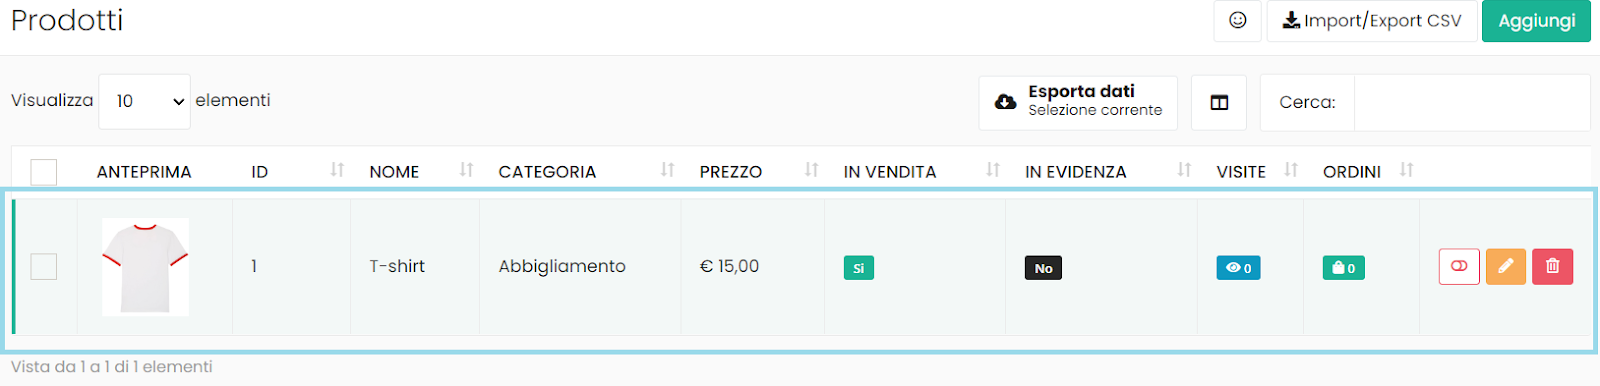
Once everything is saved, the products will be visible on the screen in the following way, and they will be part of your product list.
Managing customer appearance
Related to what we have just discussed is the matter of clientele.
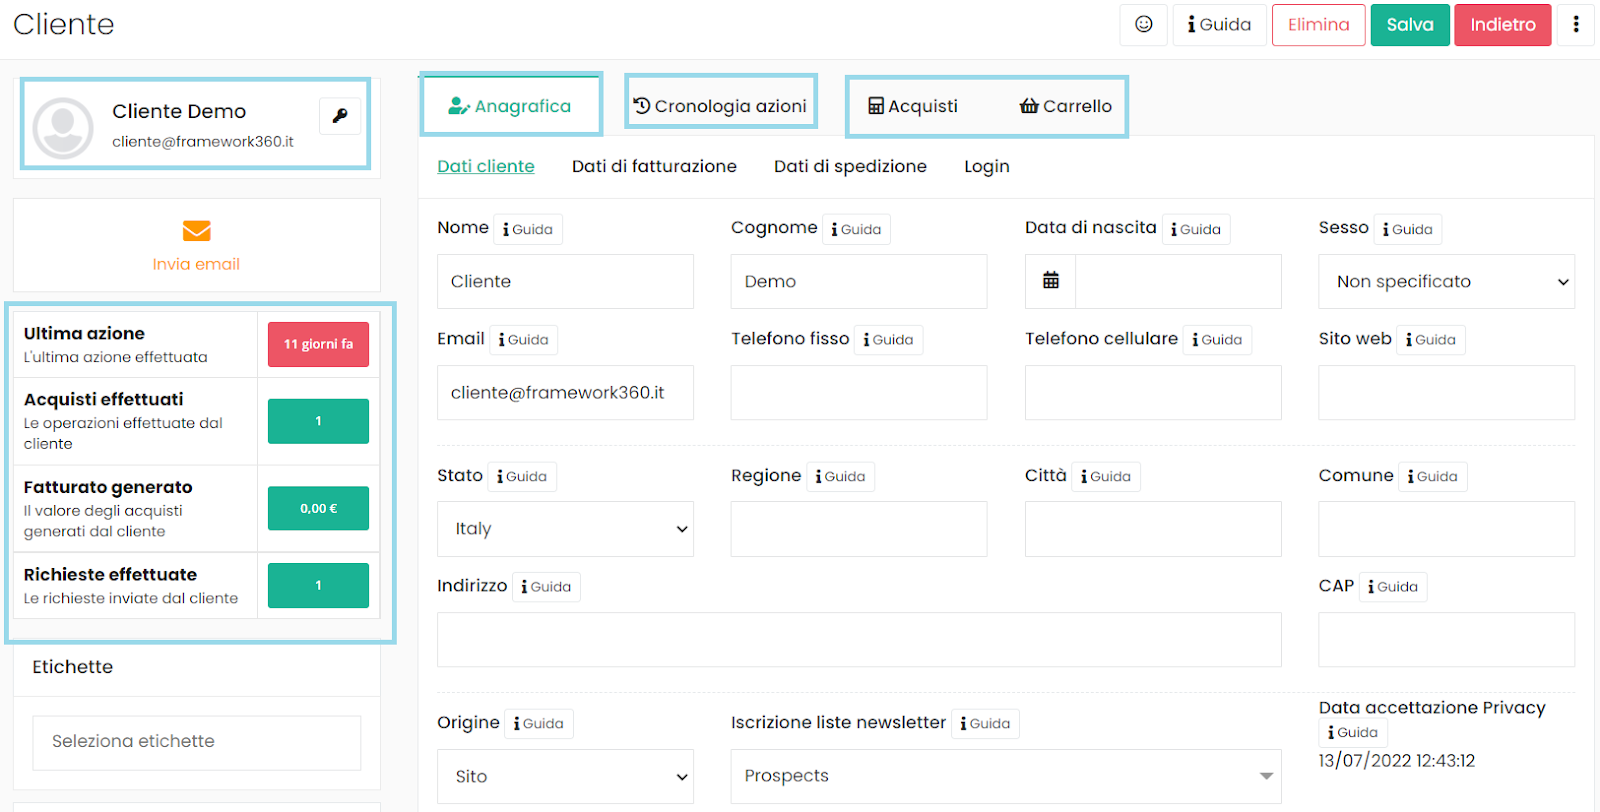
For managing this, the platform provides us with a dedicated and homonymous section, where you can enter your customers even through importing a CSV file with all their personal details, and then be able to view them on the screen that will open by clicking on each of them.
It will indeed be possible to monitor even the actions carried out on our e-commerce site, such as registration and purchases.
There are also additional ways to interact with our clientele, among which the "Notifications" module should be mentioned, albeit briefly.
Upon opening this section, we will find various options to get in touch with customers through the use of quick messages and/or service push notifications, such as a welcome message or a reminder for an order awaiting payment.
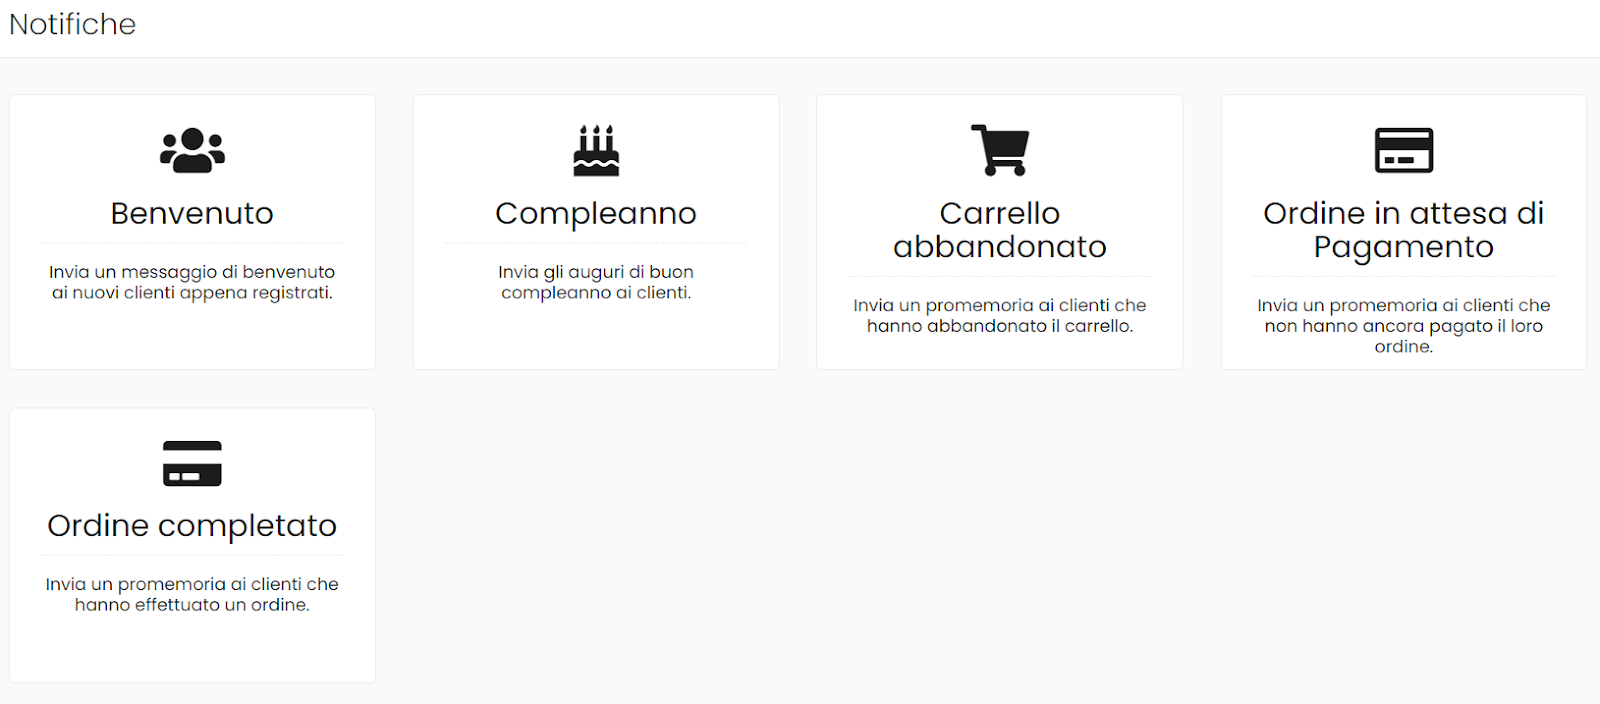
Everything will be easily configurable thanks to the visual builder that we have already encountered in other sections of the platform
In conclusion
After this overview of many of the features provided by Framework360, we will be able to navigate the platform with greater confidence and understand which fields to set and modify as a priority, to start our online sales activity.
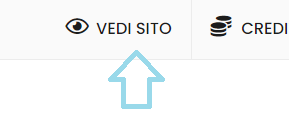
We also emphasize that to sell any modification applied to the site, just click on the "View site" button at the top and it will be possible to observe the changes and configuration of the homepage and all the pages you are creating.
For any doubts or curiosity and to learn more about the platform's features, we invite you to also check out our quick tutorials on the Framework360 YouTube channel.
You can do it too, you just need a lot of commitment and an excellent marketing and sales platform.


