Within this guide, we will explore how to create an e-commerce website using Framework360.
Firstly, it is important to distinguish whether we want to create an e-commerce site with a single product or multiple products. In the first case, that is if we want to sell a single product, it will suffice to go to the Checkout section of the main menu of Framework360, set up the checkout and manually insert our product; we have covered this in a specific guide which you can consult by clicking here.
In this guide, however, we will focus on how to create an e-commerce website for selling multiple products.
Step 1: Install the Ecommerce plugin
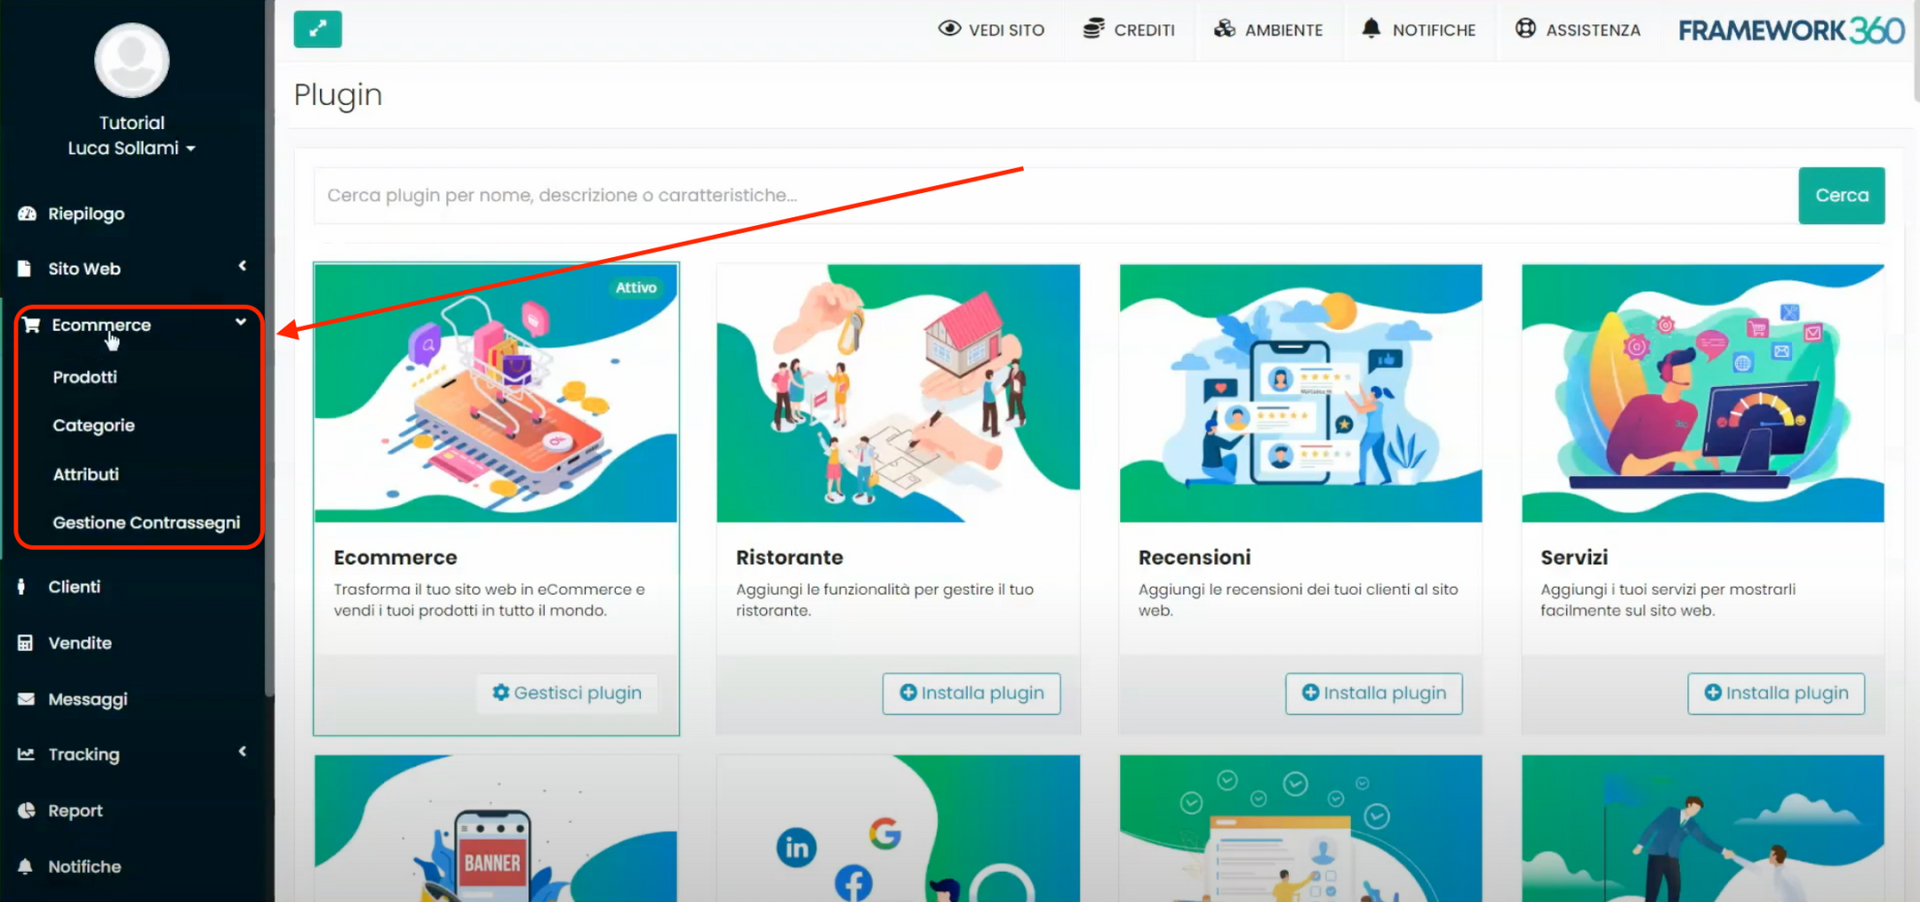
First, we need to install the Ecommerce plugin, to do so let's head over to the voice Please note that I've left the last sentence incomplete as it was provided that way in the original text. Plugin of the main menu in Framework360 by following these steps:
Customization > Plugins
Once inside the plugin screen, we search, through the dedicated search area, for the Ecommerce plugin and install it.
After installing the plugin within the main menu of Framework360, a new section called Ecommerce will open up, through which we can expand our website with all the multi-product functionalities.
Step 2: Set the preferences for the Ecommerce plugin
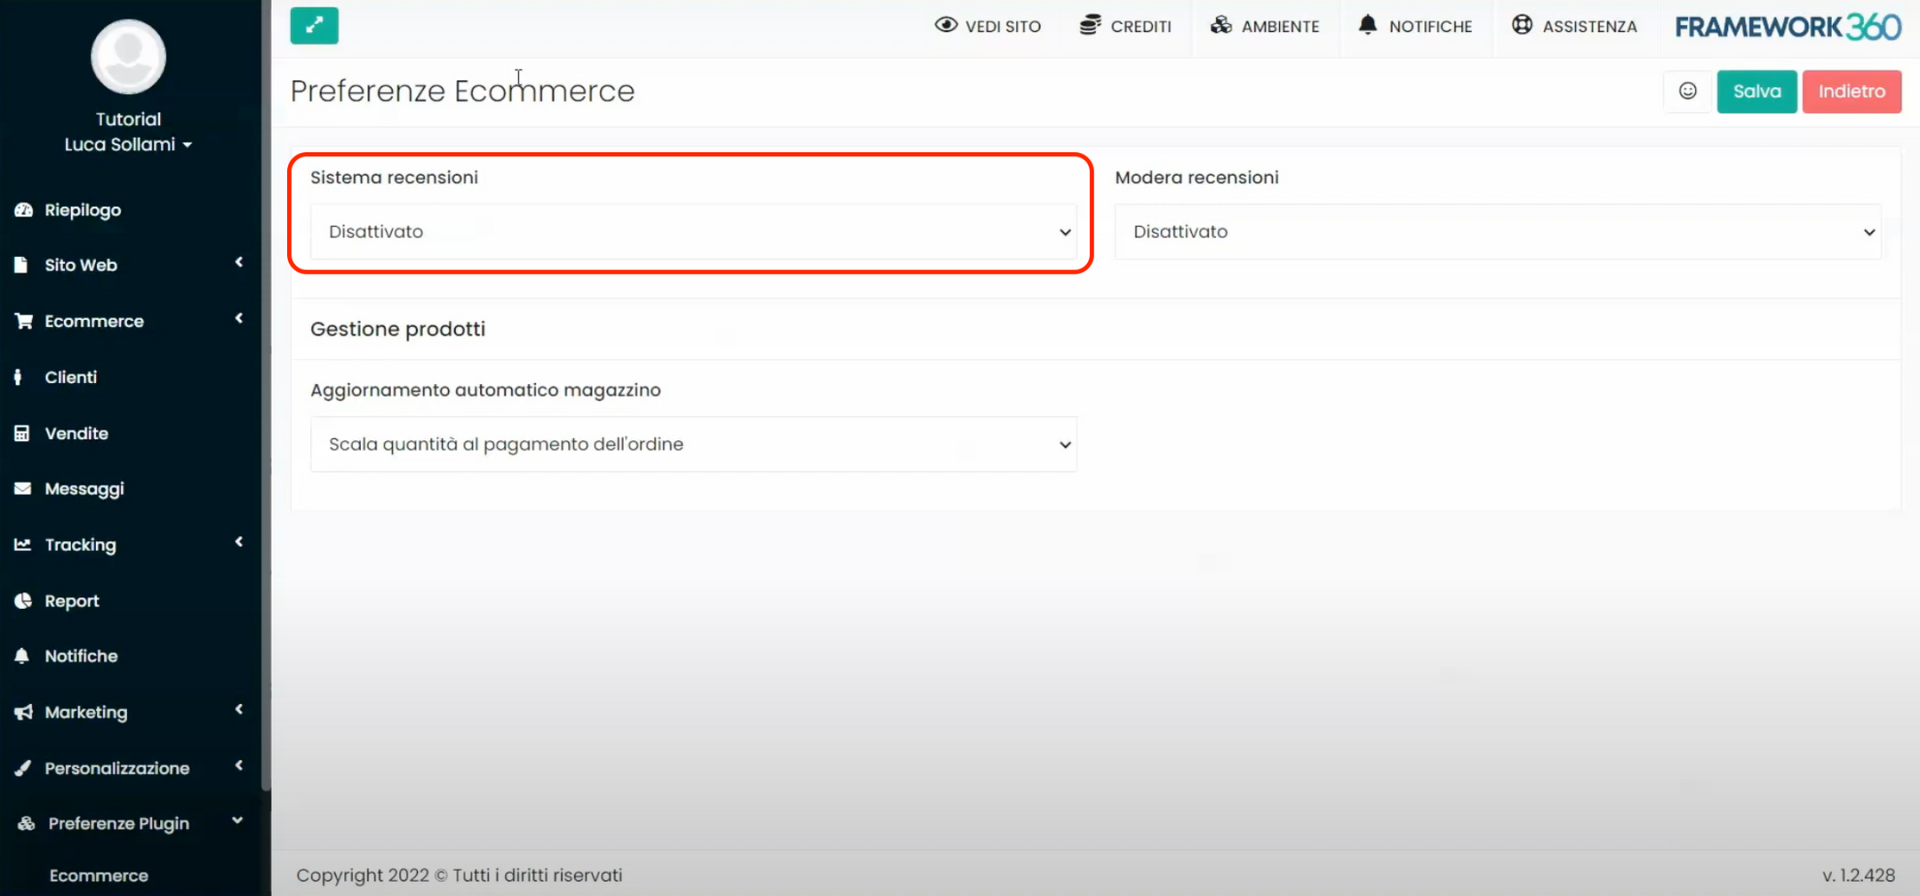
After installing the Ecommerce plugin, we need to go to the section Plugin Preferences from the main menu of Framework360 and go to the Preferences Ecommerce section by following these steps:
Customization > Plugin Preferences > Ecommerce
Once inside the customization page for Preferences Ecommerce, through the Review System option we could decide whether to activate the possibility for our customers to leave reviews or not.
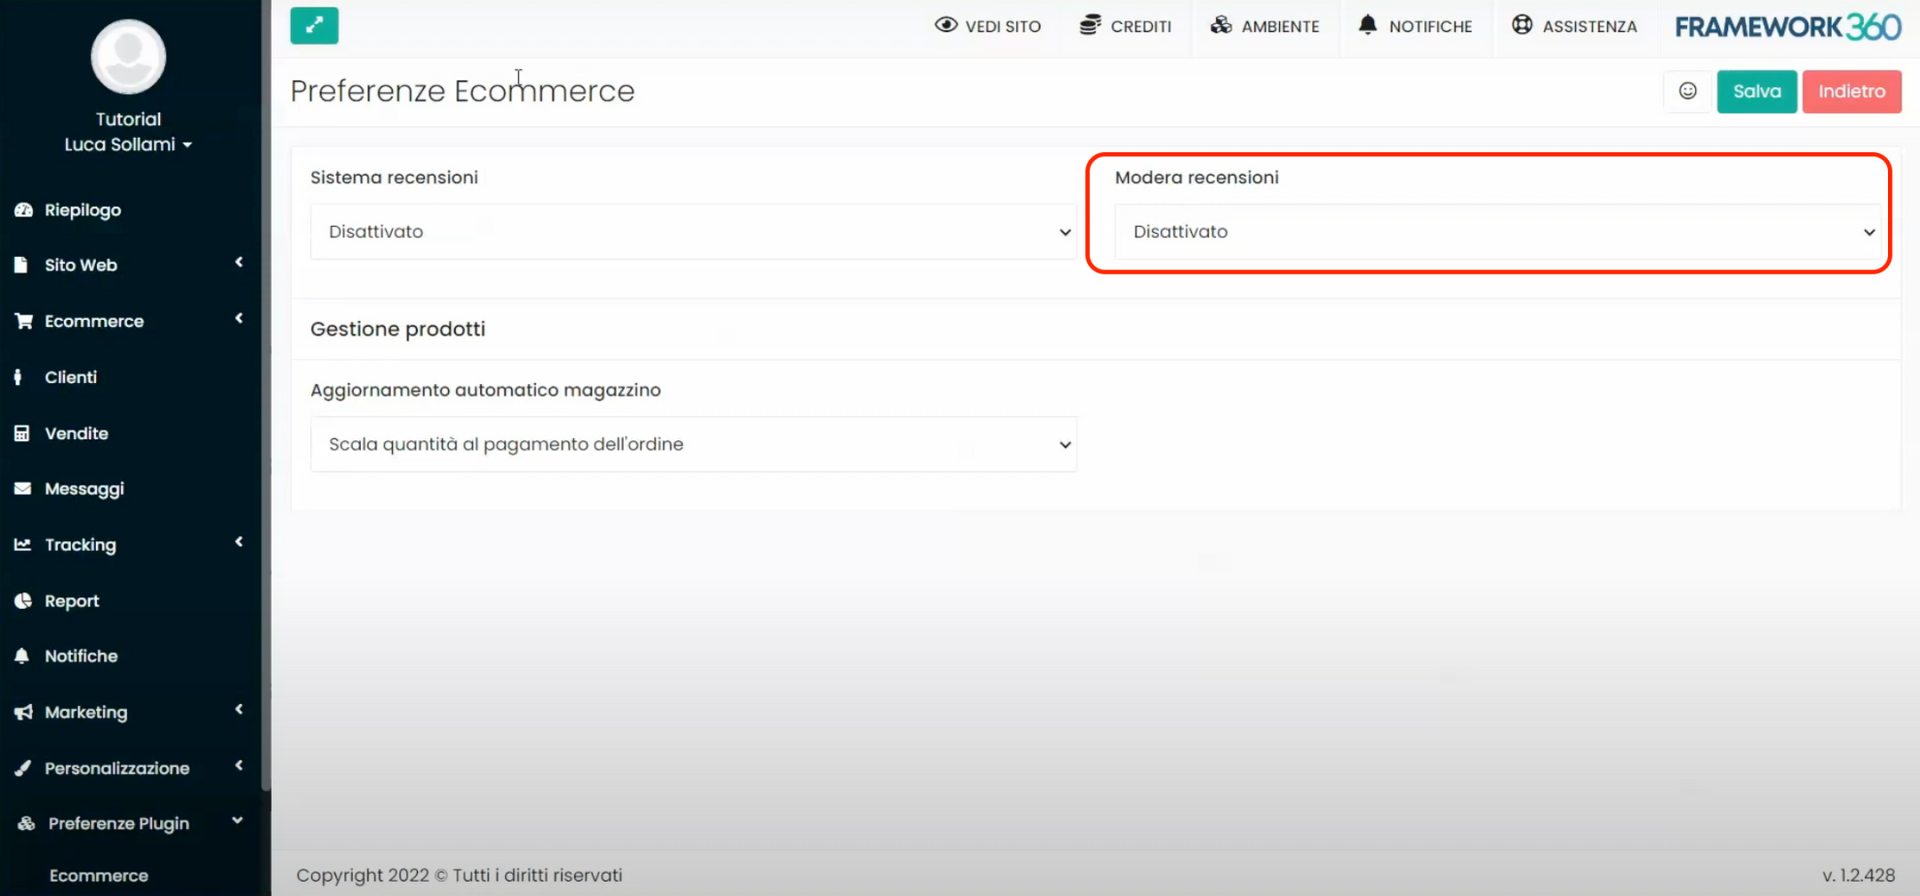
Whereas, by going to the Moderate Reviews option, we could personally approve customer reviews before they are actually published on the site.
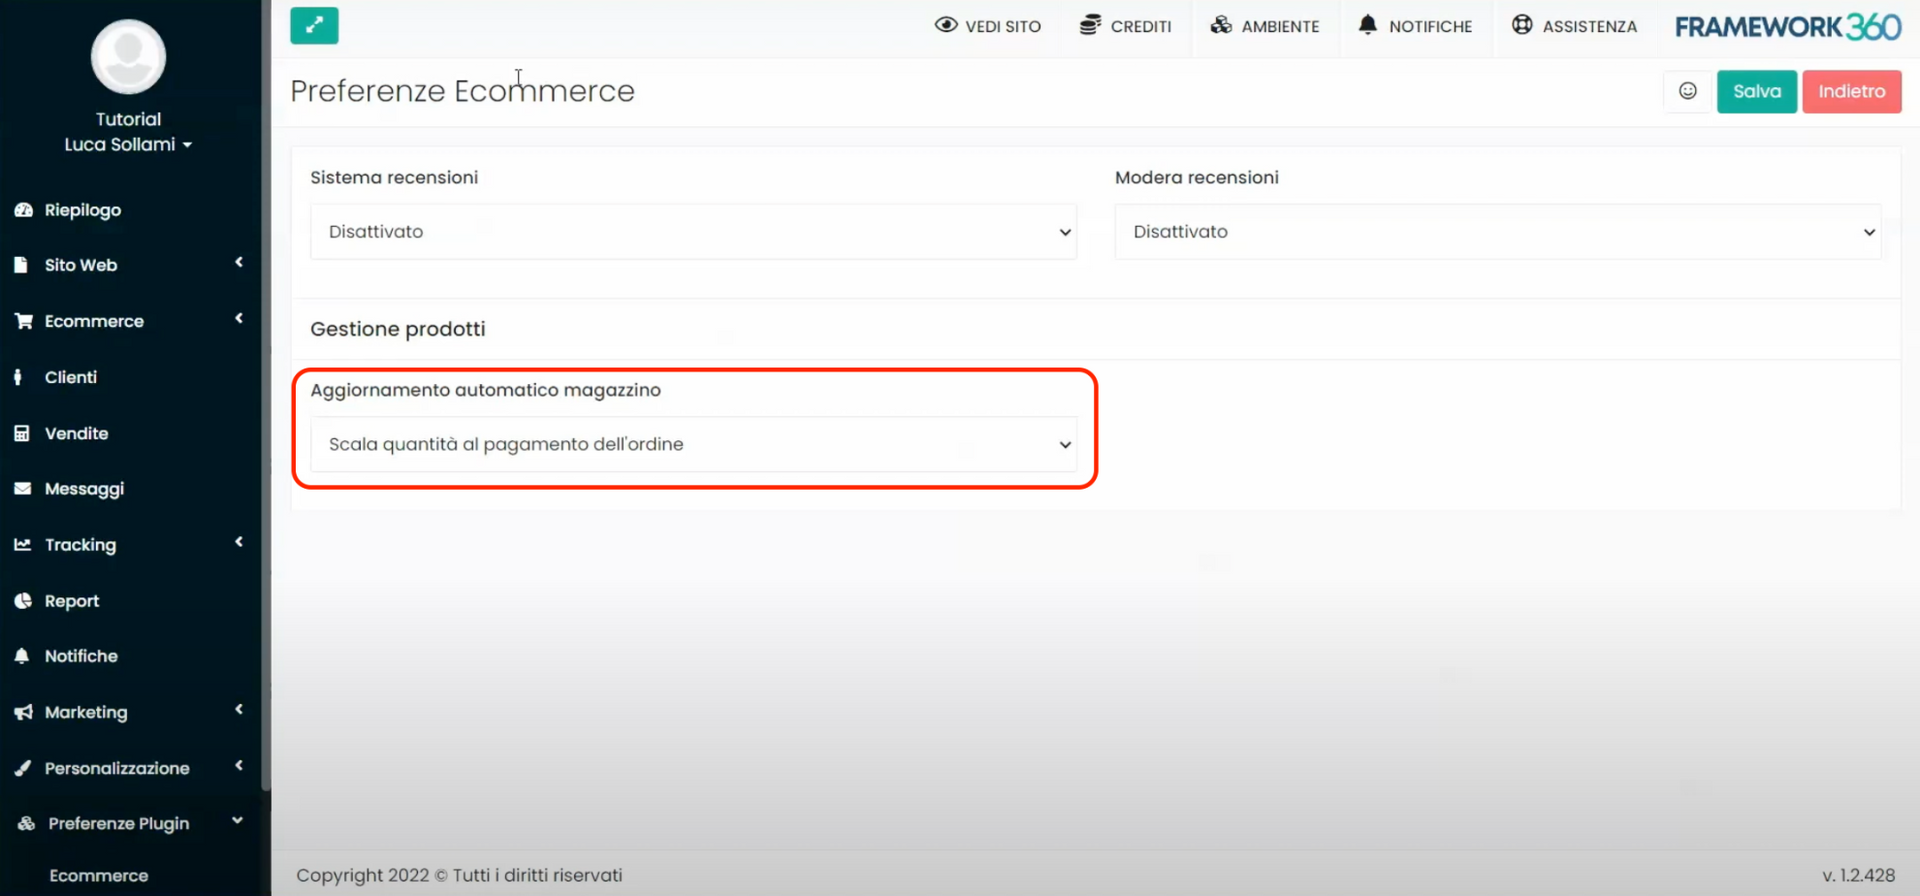
Finally, through the option Automatic inventory update, we could decide whether the inventory should automatically deduct the sold quantity at the moment the customer places an order or when the order is paid.
Step 3: Adding a product to our E-commerce
To add a product to our E-commerce, let's go to the Products section in the main menu of Framework360 by following these steps:
Ecommerce > Products
Once inside the Products screen, we click on the green button at the top right Add.
In the product creation screen, we have several tabs that allow us to customize the creation of our product in detail.
TAB PRODUCT
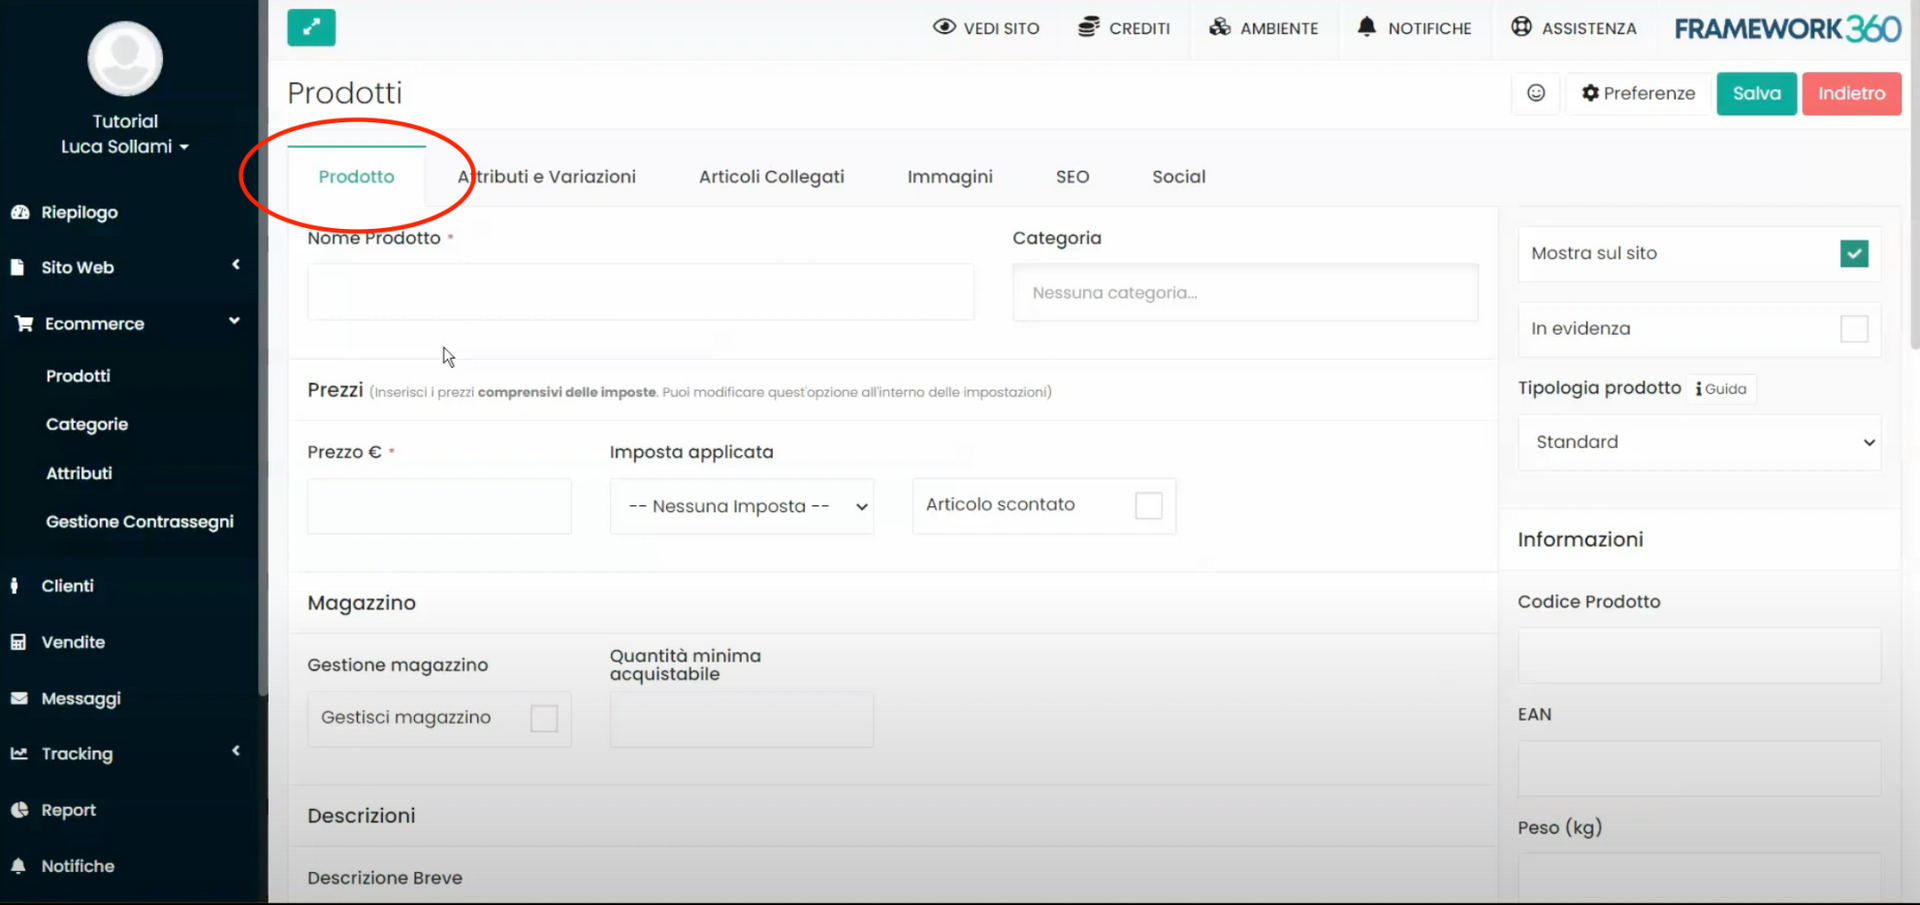
Inside the tab Product we can add:
- the name of the product;
- the reference category (in a moment we will also deal with creating the category);
- the price;
- any tax to be applied to the price;
- Any potential discount on the item and the time limit of the discount;
- the stock quantity of the product;
- the minimum quantity of product that can be purchased (useful for wholesale websites);
- the short description and the extended description of the product;
- decide whether to highlight the product;
- the type of product (standard, digital, or gift voucher);
- the product code;
- the EAN;
- The weight of the product.
TAB ATTRIBUTES AND VARIATIONS
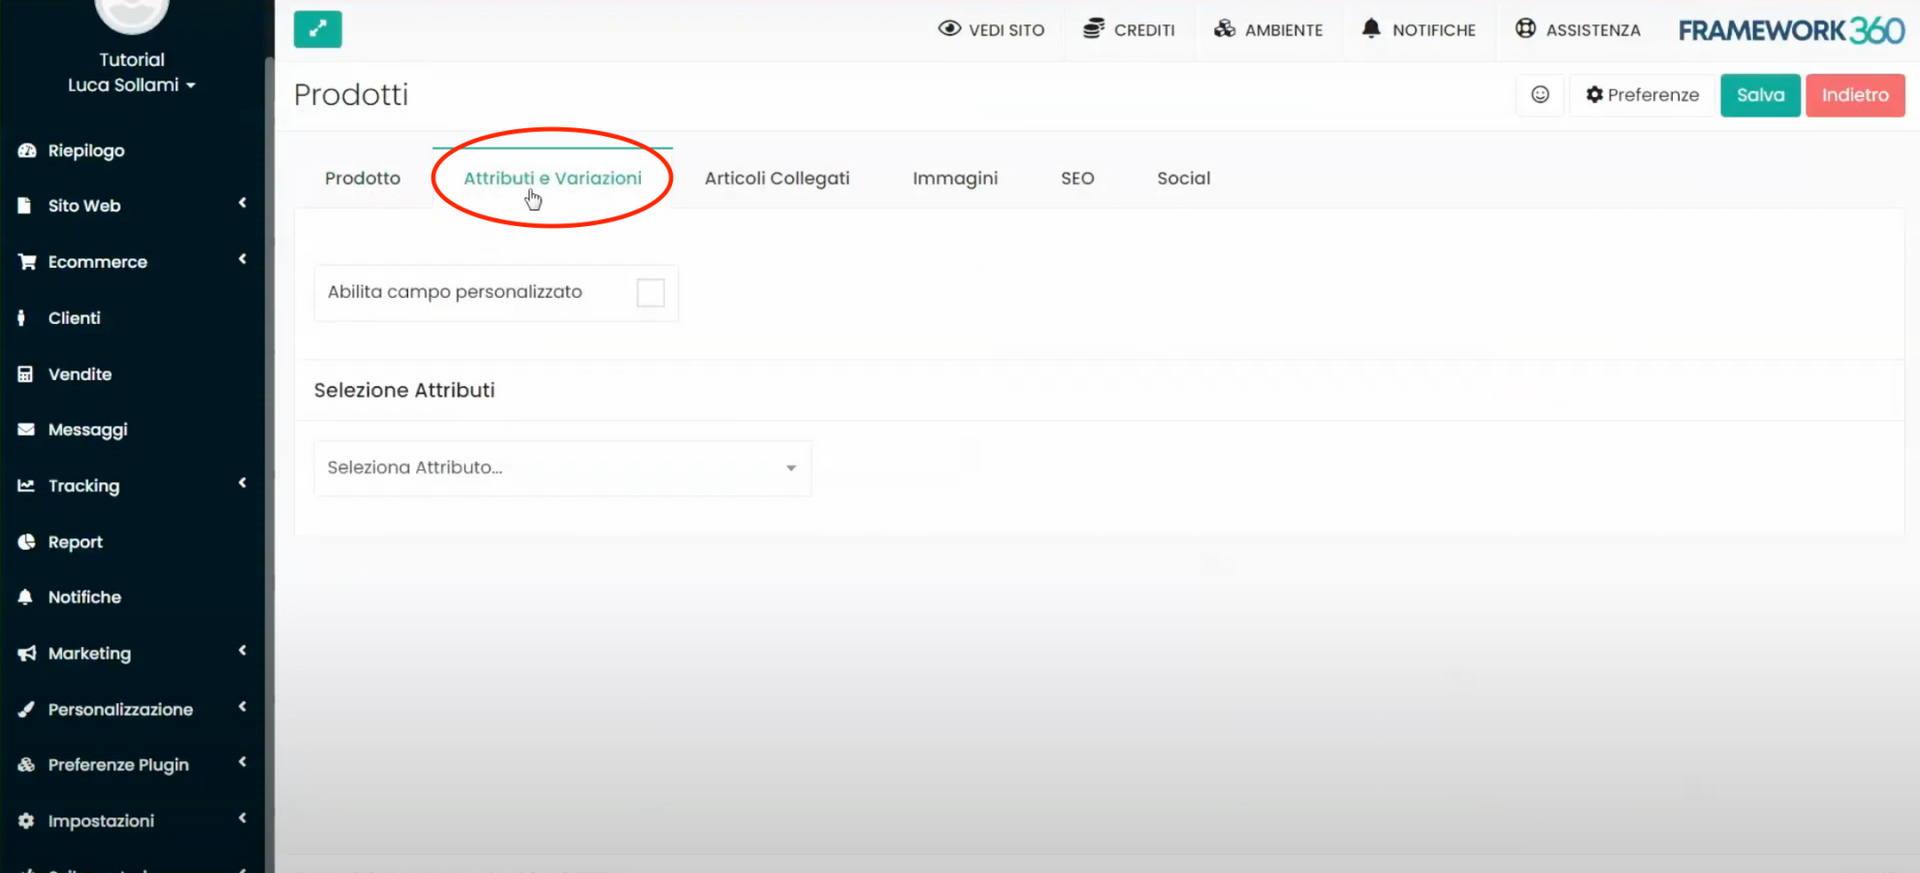
Meanwhile, moving into the tab Attributes and Variations , we can select any attributes of the product if it has variations, for example in size or color.
To be able to add attributes to our product, it is necessary that such attributes have been previously created in the designated area of the main menu of Framework360 called Attributes. To reach the Attributes area we need to go to the main menu of Framework260 and follow these steps:
Ecommerce > Attributes
Once inside the Attributes area, to add a new attribute we click on the green button at the top right Add. At this point, the attribute creation screen will open where we can create and define the variation we desire.
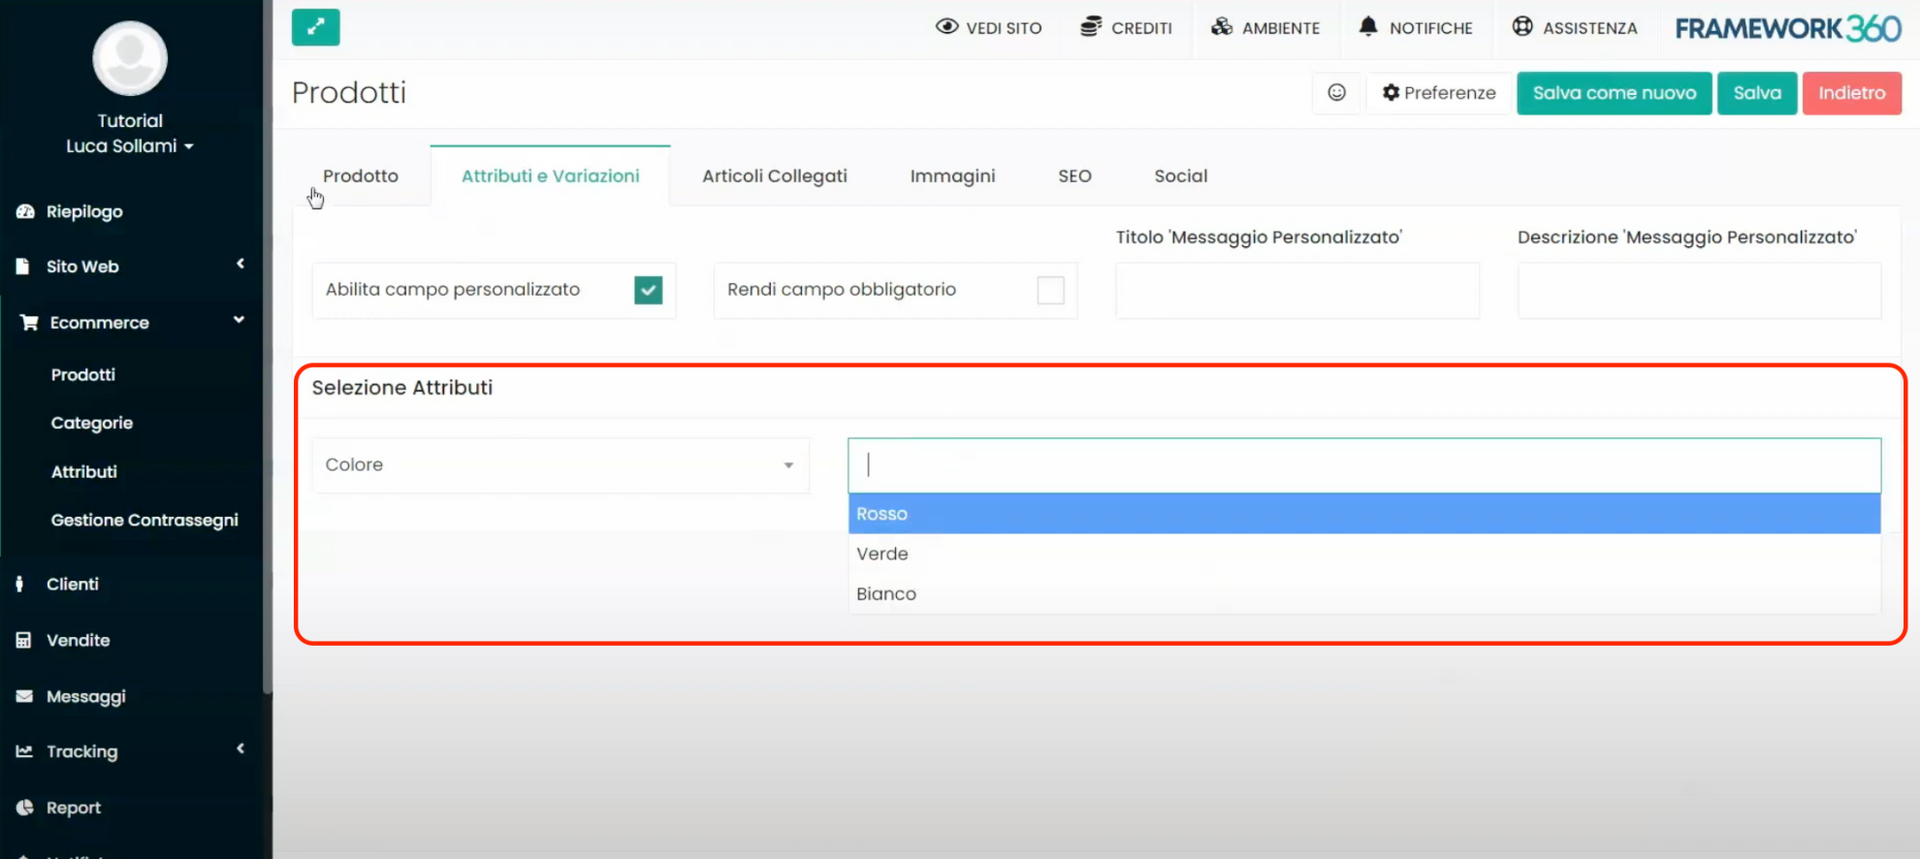
After creating our attribute, we can return to the tab Attributes and variations, which is inside the product creation screen where we were before, and select the attribute we created. In the following figure, we see an example where we are going to select the color attribute of our product:
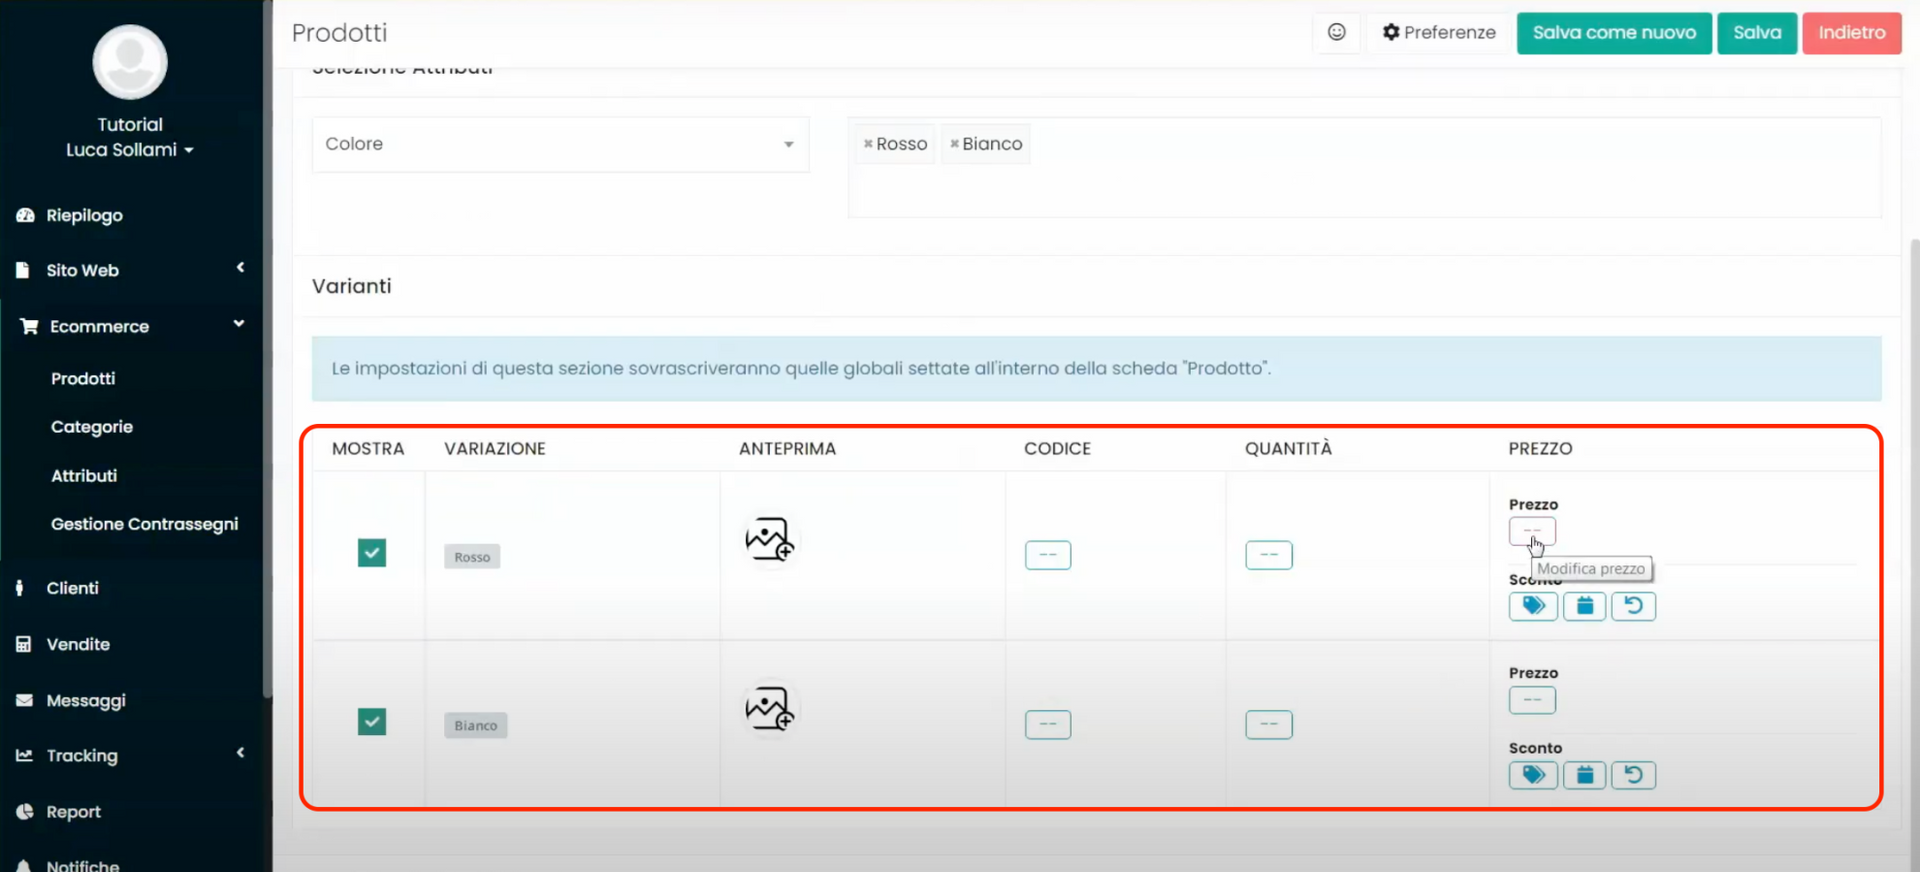
Once the desired attribute is selected, by continuing to scroll within the Attributes and Variations tab we can proceed to insert an image, a code, the quantity, and the price for each variant of our attribute. In the example shown, we have the possibility to insert the image of the red-colored product, the image of the green-colored product, and their respective codes, quantities, and prices if these should vary in comparison to what was entered in the previously seen Product tab.
TAB RELATED ARTICLES
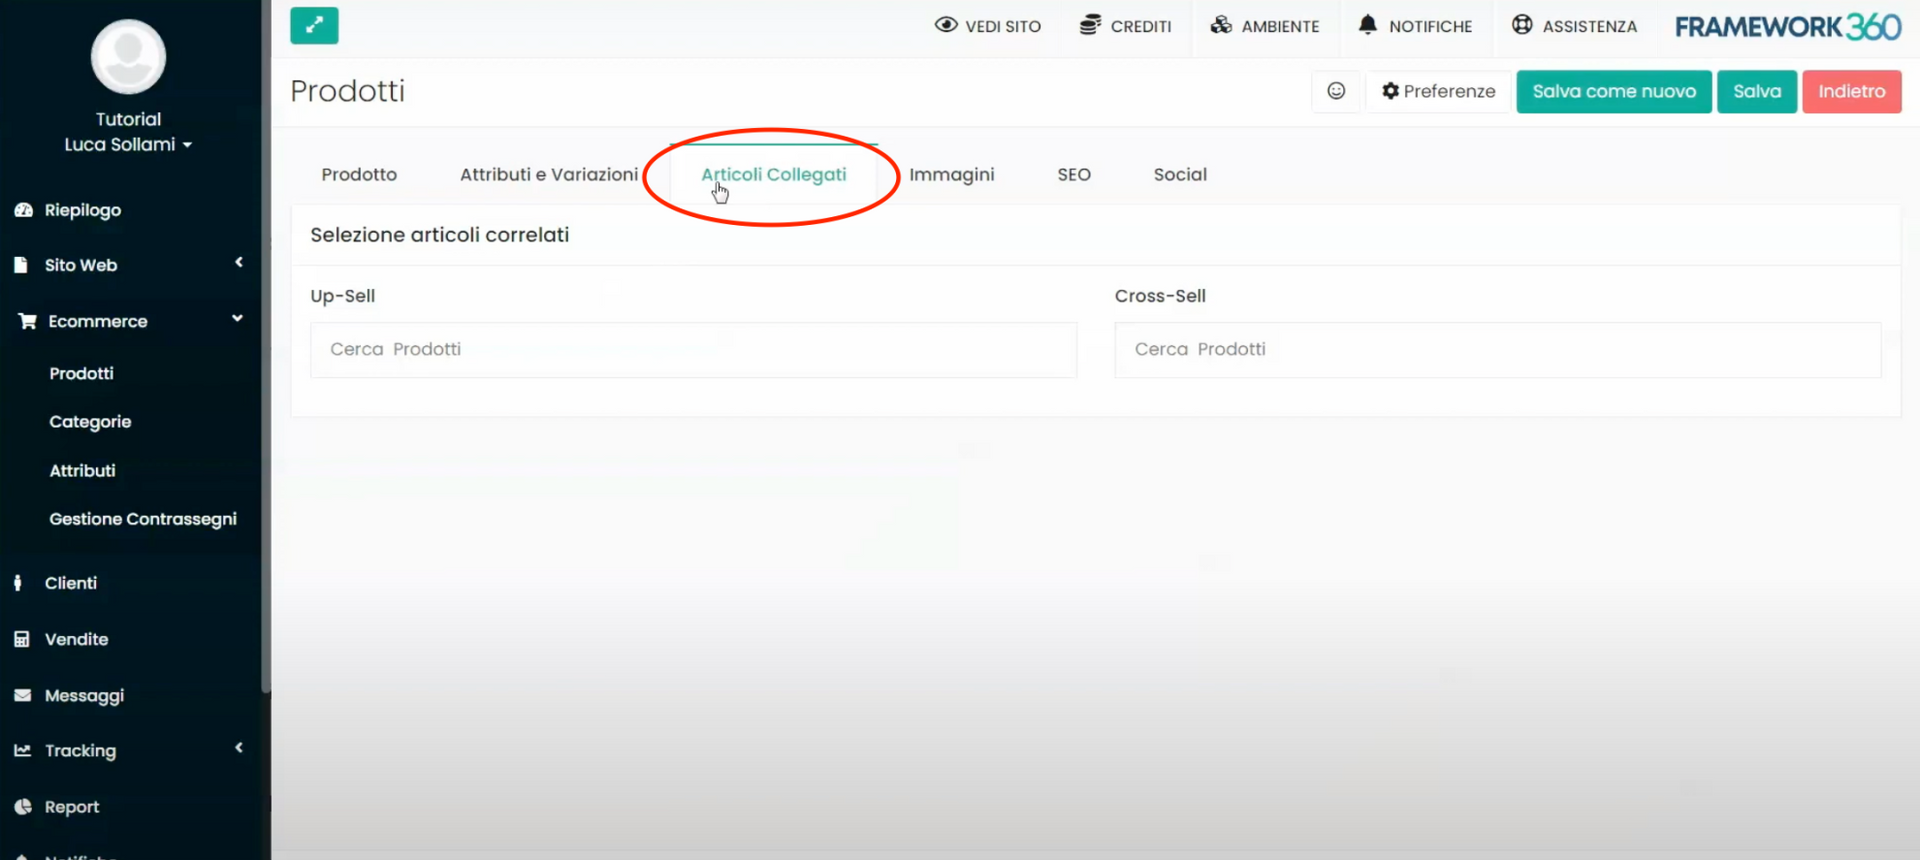
Within the tab Related Articles, we have the possibility to insert any related articles in:
- Up-Sell, that is, to insert an upgrade of the product (for example, if the product in question is a model of shoe, the up-sell could be a similar but more expensive shoe model), it will be suggested to the customer to purchase the upgrade instead of the product they are looking at;
- Cross-Sell, that is, to insert a product related to what the customer is viewing (for example, if the product in question is a model of shoe, the cross-sell could be a pair of socks), it will be suggested to the customer to consider buying both products together.
TAB IMAGES
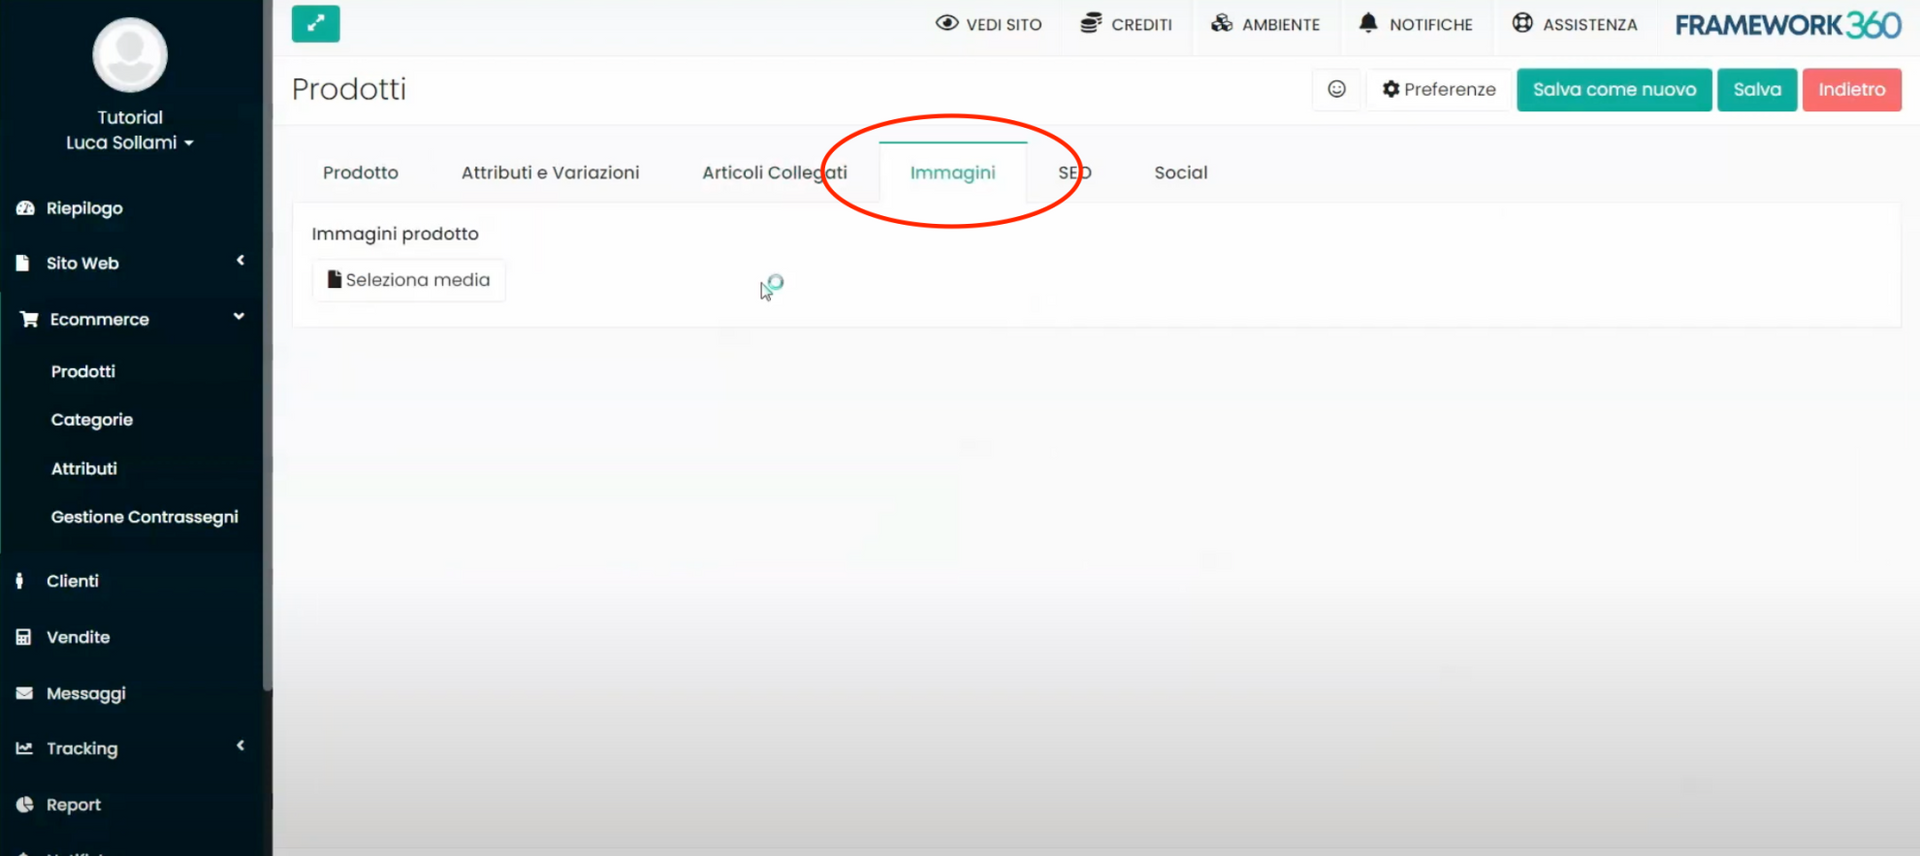
In the tab images we have the ability to upload several images of the product. Remember that to insert different images based on a certain attribute, as seen previously, we should go to the tab Attributes and Variations.
TAB SEO
In the SEO tab we have the possibility to insert a TAG Title and a TAG Description to decide how the product will appear on the search engine.
TAB SOCIAL
Finally, within the Social tab we can decide how our product will appear on social media, so, the same principle we saw for the SEO dedicated tab but for Social Networks.
Step 3: Let's create the categories and subcategories for our products
On how to create categories and subcategories for our products, we have prepared a dedicated article that I invite you to consult by clicking here.
Step 4: Add the products to the website to make them purchasable
Once the products are created, all that remains is to insert them onto the website to make them purchasable.
Firstly, we need to go to the page of the website where we want our products to appear which, for example, could be the site's homepage. To do this, let's navigate within the item Pages in Framework360's main menu following these steps:
Website > Pages
Once inside the summary screen of all the web pages, let's click on the page where we want to insert our products to modify it.
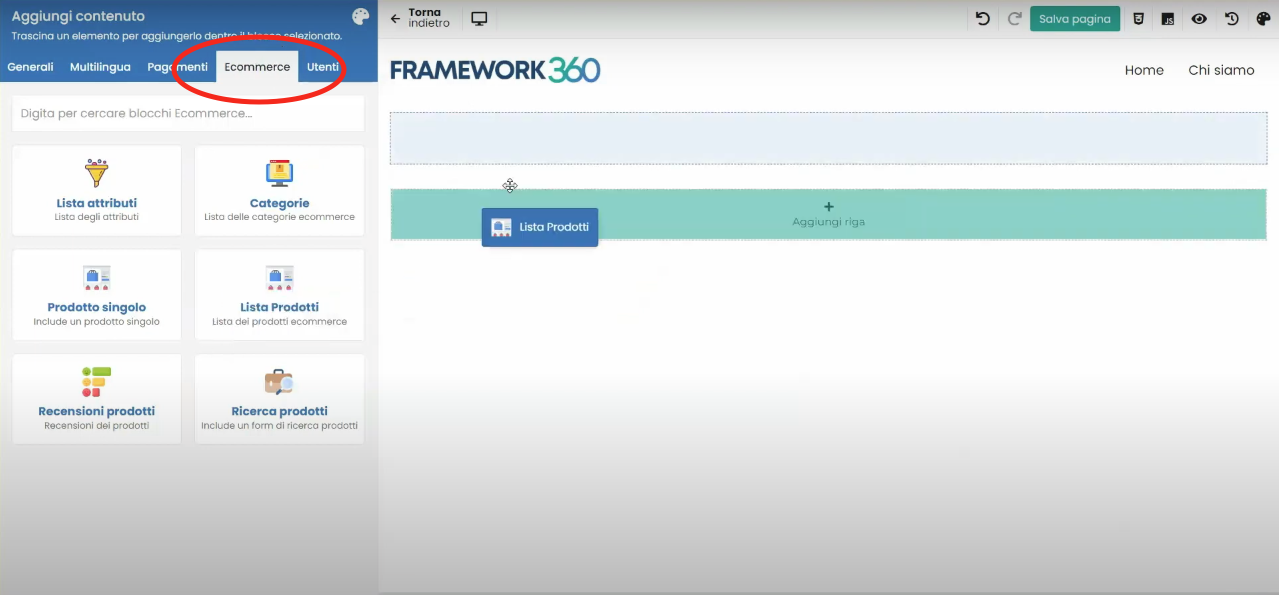
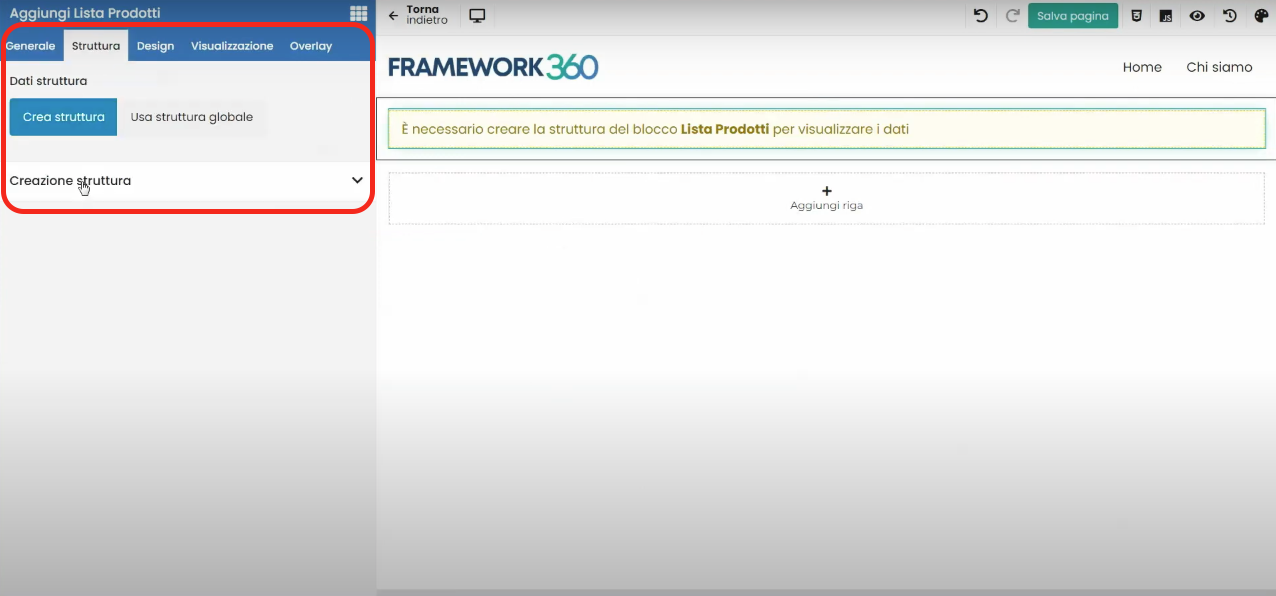
Well at this point we are inside the edit screen of the page we have selected, let's now add a row and, through the visual builder of Framework360, insert within the row the block Product List (located inside the Ecommerce tab) as shown in the following figures:
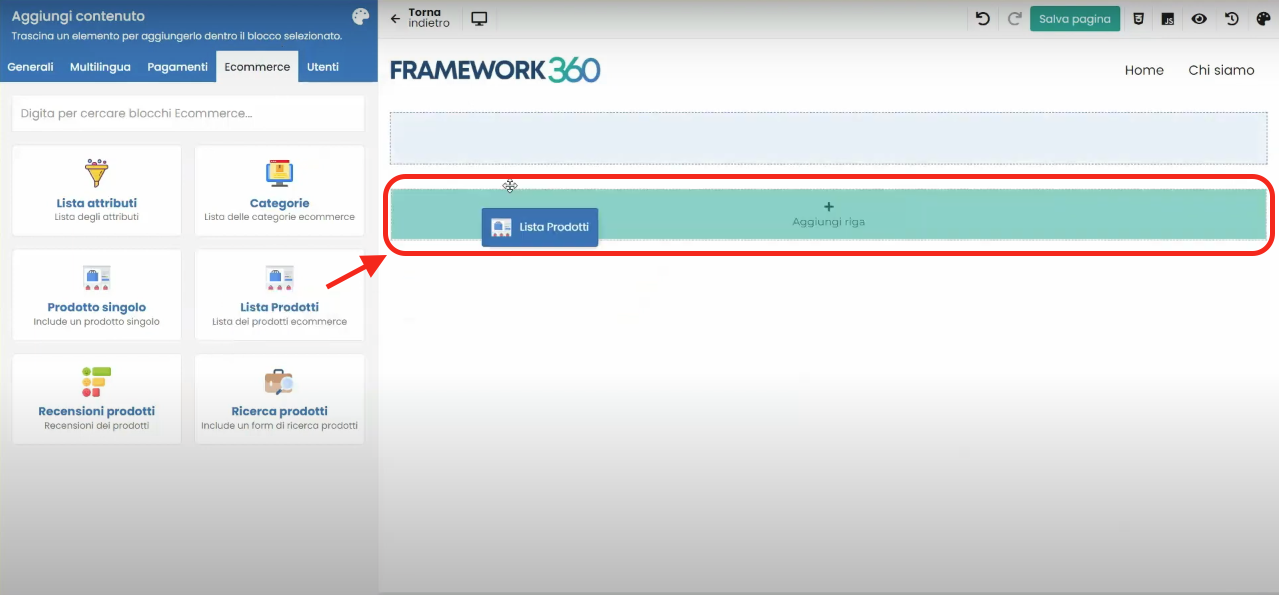
At this point, Framework360 will tell us that it is necessary to create a structure for the block. To do this, go to the Structure tab to create a new structure or import a previously created structure as shown in the next figure:
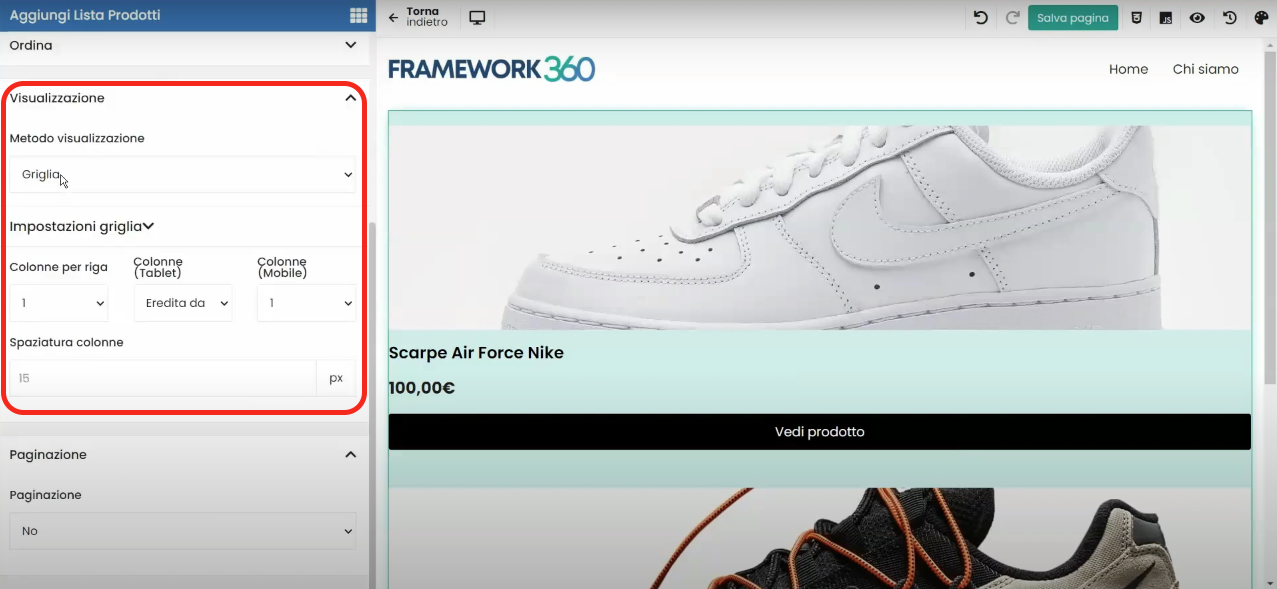
Once we have defined our structure, if we wanted to modify its display (for example, to define whether we want the products to appear within a grid or a carousel and how many products should be displayed in the grid or carousel on various placements mobile, tablet, and desktop) we should go inside the General tab under the item Display.
Step 5: Modifying the Product Page
Once we have created the product, Framework360 will automatically generate a page where the product will be displayed. If we want to modify this page, all we need to do is go to the Pages section within the main menu of Framework360 by following these steps:
Website > Pages
Once inside the Pages section, we search for our product's page and by clicking on it, we can modify it using Framework360's visual builder.
Alternatively, if we do not wish to manually alter the graphics of our product pages, we could install one of the many e-commerce templates that Framework360 provides. To change the template, we would need to navigate to the Themes section in Framework360's main menu by following these steps:
Customization > Themes
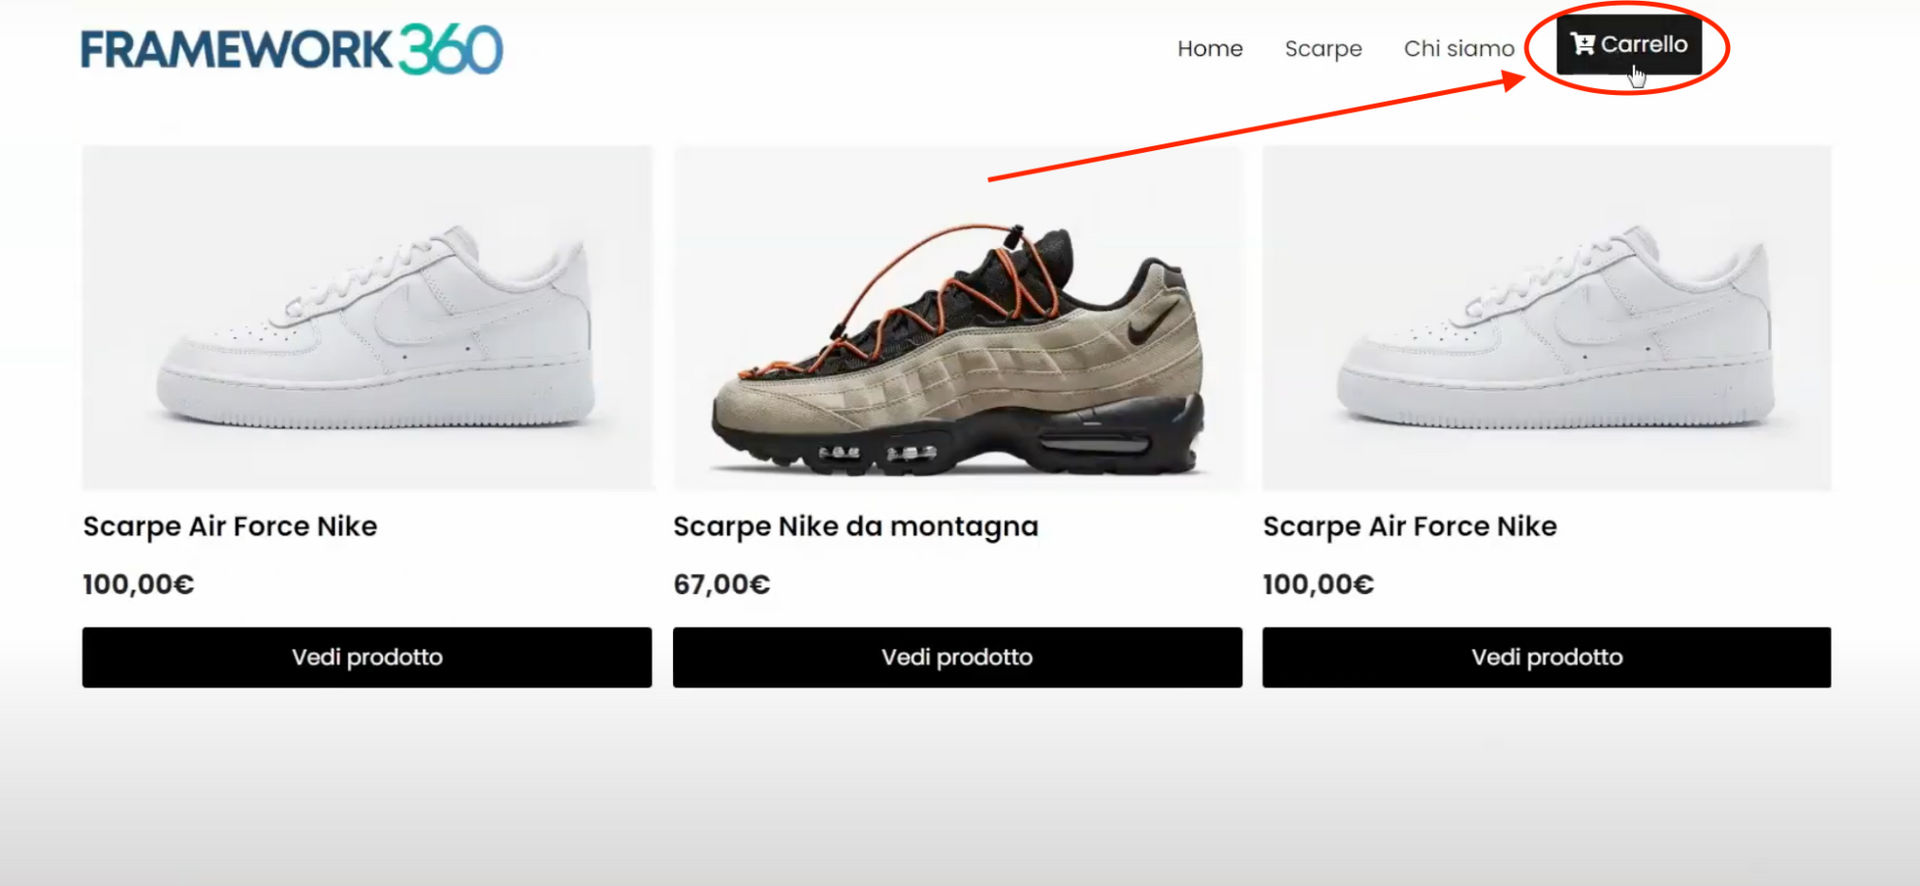
Step 6: Let’s Add the Cart Inside the Main Menu
Now let's see how we can add the cart to our site's menu, that is, in the header of the site. To do this, let's go to the Global Blocks section of the main menu of Framework360 by following these steps:
Website > Global Blocks
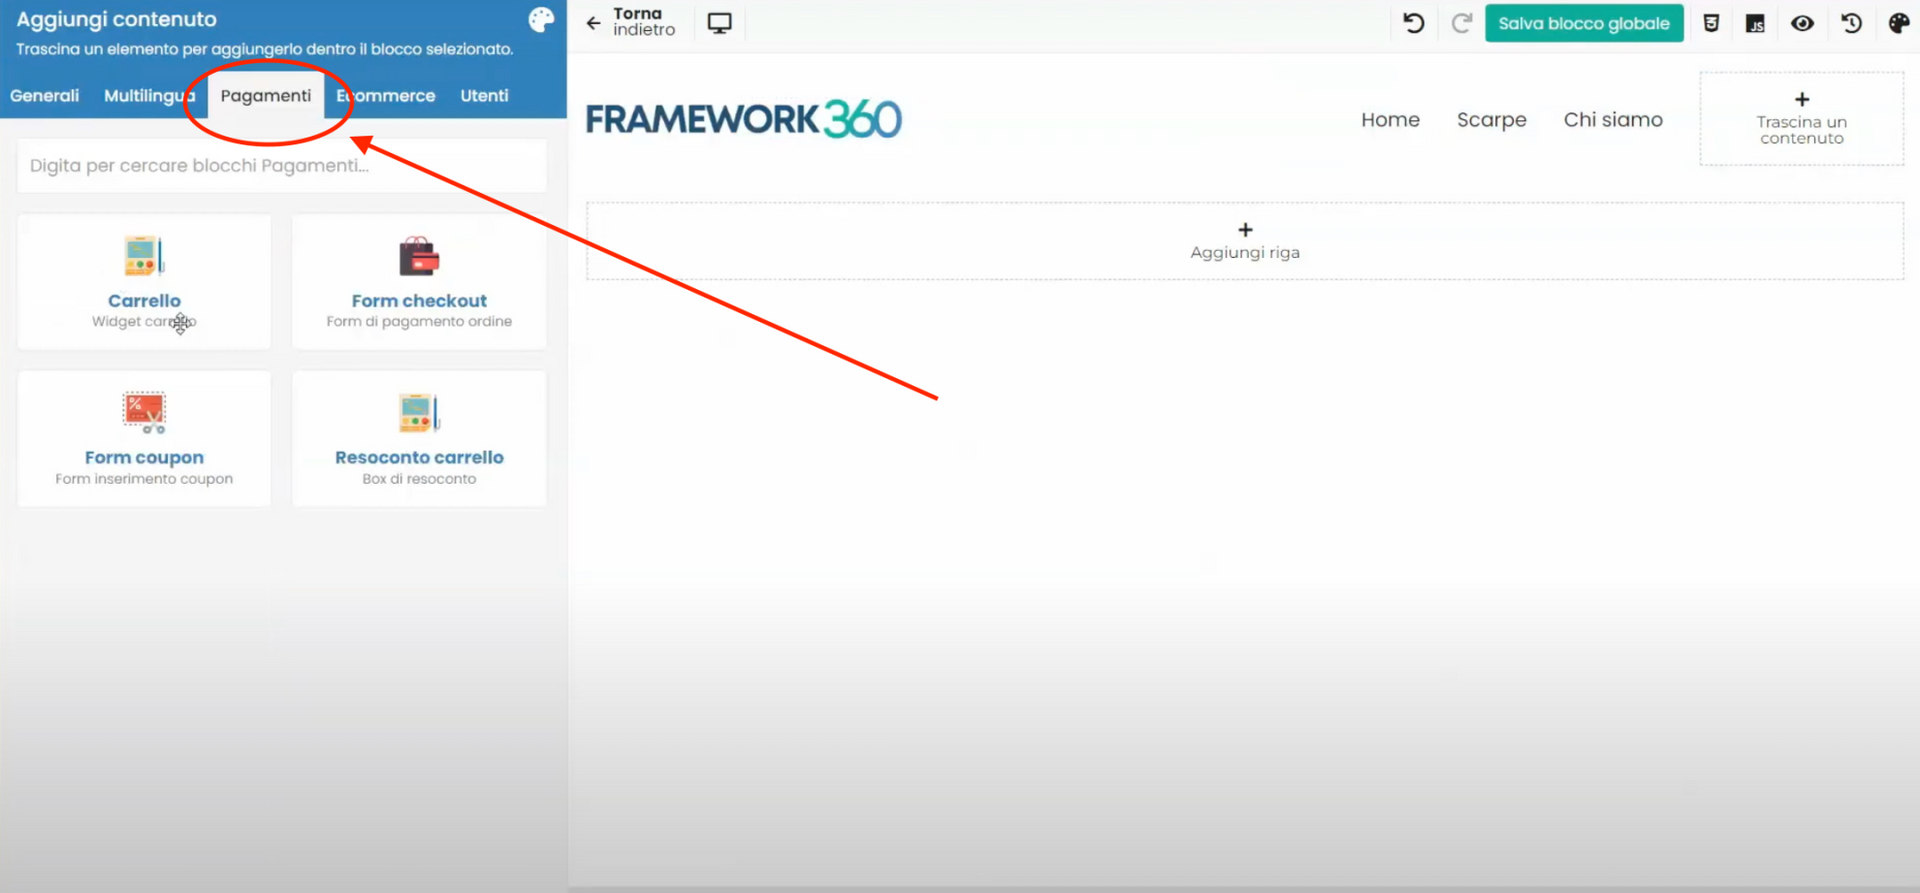
Once inside the Global Blocks screen, click on the Main Menu block to modify it. At this point, insert a new column into our menu and move inside it, through Framework360's visual builder, the block Cart as shown in the following figure. The cart block can be found within the tab Payments of the visual builder.
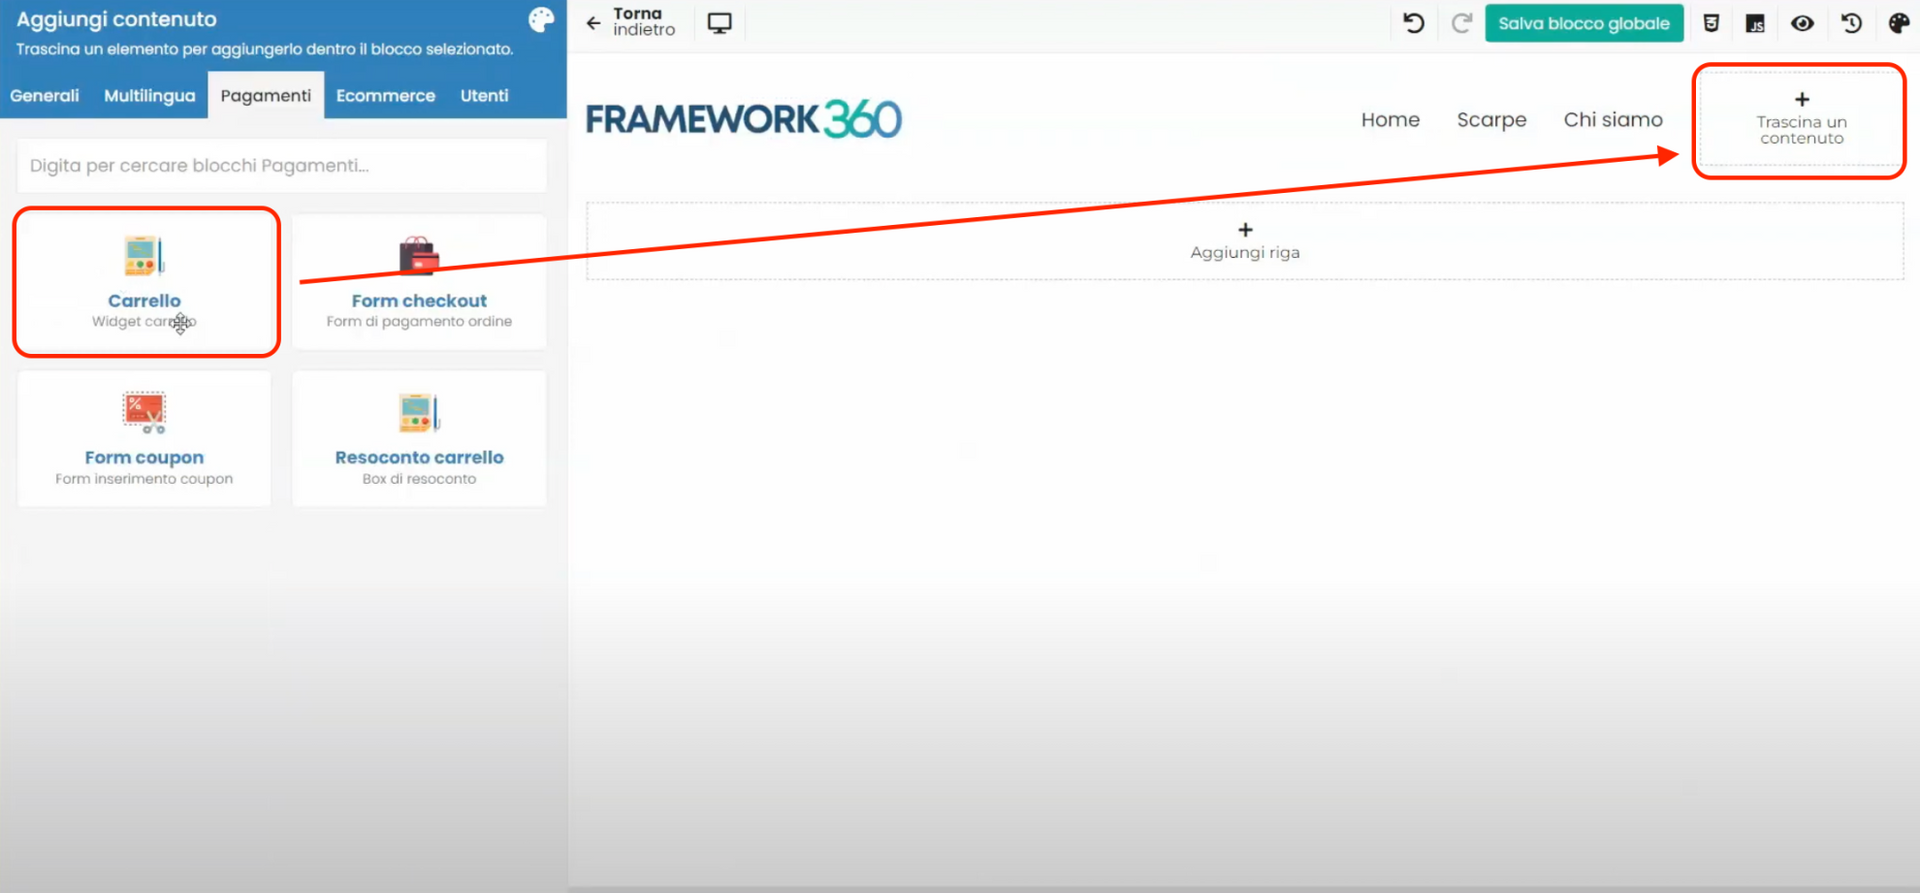
After adding the Cart block, we can set it up as we like, again through the visual builder, and that's it!
If you want to discover how to create the header of your website with Framework360, we have prepared a specific guide that you can consult by clicking here.
Step 7: Setting Up the Checkout
The time has come to set up the Checkout. A checkout is the final part of an e-commerce website that allows the customer to purchase the products they have previously added to their cart or are intending to buy.
On how to correctly set up the Checkout, we have created a dedicated guide which I invite you to consult by clicking here.
Step 8: Connecting PayPal and Stripe Payment Methods
Well, we have reached the last step of the purchasing phase, namely, the payment. In order to allow customers to make payments, we need to connect a payment method to our e-commerce website; the most commonly used methods are
PayPal and Stripe. We have created two specific guides in which we explain how to connect these two payment methods to Framework360. To consult them, click on the links below:- How to connect PayPal to our website built on Framework360
- How to connect Stripe to our website built on Framework360
Step 9: Creating a discount coupon
Lastly, it is important to mention that Framework360 also gives us the ability to create a discount coupon that customers can use when making purchases on our e-commerce site. For greater clarity on this topic as well, we thought it appropriate to create a dedicated guide which you can consult by clicking here.


